03 From Greenfield to Brownfield: AI-Assisted Development in Existing Codebases
March 2026 (10142 Words, 57 Minutes)
1. Introduction
Welcome back to Week 2 of Act I — Experience. Last session, you saw three fundamentally different approaches to AI-assisted development — from a single copy-paste prompt to a professional SDLC workflow with requirements, tests, git discipline, and an AI Diary. You were sent off to repeat the Stack Overflow Challenge using Approach 3. By now you have attempted that second round: setting up a project with uv, writing requirements before code, creating tests before implementation, committing at every step, and maintaining diary entries alongside every prompt cycle.
Before we move on, we need to close that loop. Then we will enter entirely new territory.
In Lectures 1 and 2, every line of code you touched was code you wrote. You chose the file names, the directory structure, the architecture. You controlled everything. That is called greenfield development — building on a blank canvas.
Today we ask: what happens when the canvas is not blank?
2. Closing the Loop: Stack Overflow Challenge Round 2
2.1 The Feedback Quiz
We start with a short feedback quiz — the same format as the one from Lecture 1, but focused on comparing your two attempts. Open the Google Forms link on the course page and take 5-8 minutes to answer.
The key questions:
- Which approach did you use? Did you follow Approach 3 strictly, or did you blend approaches?
- Did it improve? On a scale of 1-5, was your second attempt better than the first?
- Iteration count: How many prompts did it take? Compare to your first attempt.
- AI Diary experience: Did maintaining the diary feel like overhead, or did it become useful?
- Confidence for unfamiliar code: How confident are you about using AI tools in a codebase you did NOT write?
That last question is particularly important. Hold onto your answer — we will revisit it at the end of this lecture.
2.2 What We Expect to See
When we look at the aggregated results, certain patterns should emerge:
Iteration counts will likely go down. Approach 3 front-loads the thinking: you write requirements before code, tests before implementation. Each prompt is scoped and specific. Compared to a monolithic “build me a Stack Overflow chart” prompt that triggers a cascade of fixes, the structured approach typically requires fewer total iterations — even though it has more individual prompt steps.
Confidence will likely go up. Students who followed a structured process report higher confidence in their results. This is not because the AI produced better code — it is because the process provided checkpoints. When your tests pass, you know something. When your git log shows a clean progression, you can see what happened. The structure makes the outcome verifiable.
The diary will polarize — but the friction has shifted. In Round 1, the complaint was “writing diary entries is tedious.” By Round 2, writing the entry itself is quick — it is just your prompt text and a few metadata fields. The real friction is no longer the diary content but the commit discipline around it: structuring your work so that each AI interaction produces a clean, traceable commit. Some of you will find this constraining — “I just want to code, not think about commit granularity.” That reaction is worth examining. In a shared codebase with dozens of contributors, commit discipline is not overhead — it is communication. Later in this lecture, we will introduce a specific diary workflow designed for collaborative brownfield work.
Not everyone will have used Approach 3 strictly. Some of you blended approaches — maybe structured breakdown for the research phase, professional SDLC for the implementation phase. That is fine. The point was never to follow a rigid script. The point was to notice that how you interact with the AI affects what you get.
2.3 One More Thing: A CLAUDE.md for Your Challenge Repo
Before we leave the Stack Overflow Challenge behind, open the reference repository and look at the root. You will find a new file: CLAUDE.md. Take 30 seconds to read it.
It is about 45 lines. It tells an AI coding assistant what this project is, how to run it, how the code is organized, and how the tests work. Next to it, in .github/copilot-instructions.md, you will find the same content formatted for GitHub Copilot. Two files, same purpose — whichever AI tool you use, it picks up the project context automatically.
For a project this size — four source files, 250 lines of code — this file is almost unnecessary. You could paste the entire source code into a prompt and the AI would understand it. The CLAUDE.md adds roughly 500 tokens of context. That is one short paragraph, in a context window that holds hundreds of thousands of tokens.
Hold that thought. Later in this lecture, you will see a CLAUDE.md for a project with over 10,000 lines of code. That one is more than 600 lines long — and it is essential, not optional. Same concept. Completely different scale.
The question you should be asking: at what point does a project become large enough that a CLAUDE.md stops being a nice-to-have and becomes a requirement? That is one of the questions this lecture answers.
2.4 The Question That Launches This Lecture
Now look at the results for the confidence question: “How confident are you about using AI tools in a codebase you did NOT write?”
If the pattern holds, many of you rated this lower than your general confidence. And that is an honest, accurate assessment. Everything you have done so far — the Stack Overflow plot, the diary entries, the structured prompting — was greenfield. You started from an empty directory. You made every decision.
But that is not what most software jobs look like.
3. The Brownfield Reality
3.1 How Developers Actually Spend Their Time
Here is an uncomfortable statistic: 60-80% of professional software development effort goes to maintaining and evolving existing systems, not to building new ones. This figure appears consistently across industry studies — from classic software engineering research (Pressman, Sommerville) to modern reports like the DORA State of DevOps and JetBrains Developer Ecosystem surveys.
It gets more specific. A 2015 study by Minelli, Mocci, and Lanza — “I Know What You Did Last Summer,” presented at IEEE ICPC — tracked developer activity across 740 sessions and over 200 hours of IDE usage. Their finding: roughly 70% of development time goes to program comprehension — reading code, navigating call hierarchies, and building mental models of how existing components interact. Earlier work by LaToza, Venolia, and DeLine at Microsoft Research (ICSE 2006) found a similar pattern, with developers reporting that understanding existing code dominated their daily work. The consistent finding across a decade of research: the primary developer activity is not writing — it is reading.
(Whether AI tools will shift this ratio — by making comprehension faster or by generating more first-draft code — is an open question. Early data from GitHub’s 2024 Copilot studies suggests developers complete tasks faster with AI assistance, but it is too early to know how this changes the reading-vs-writing balance in brownfield settings. We will revisit this question throughout the course.)
Think about what this means for your career. When you start an internship, join a thesis project, or begin your first job, you will not build from scratch. You will inherit a codebase. Someone else wrote it — possibly many people, over many years. Someone else chose the architecture, the naming conventions, the test framework. Someone else decided which library handles HTTP requests and which ORM talks to the database. Your job is to understand what is already there and make it better without breaking what works.
This is called brownfield development — working in an existing codebase with existing constraints, existing conventions, and existing users who depend on the code behaving the way it currently behaves.
3.2 What Changes When the Code Already Exists
The shift from greenfield to brownfield changes everything about how you work — and about how you use AI tools. Let us walk through the five most important differences.
3.2.1 Context Becomes Paramount
In the Stack Overflow Challenge, the AI started with the same blank slate you did. You described what you wanted, and it generated code. The context was small: a few requirements, maybe a reference image, and whatever you had written so far.
In an existing codebase, there is a massive asymmetry: you can browse 10,000 lines of code in your editor, but the AI cannot see any of it unless you give it access. Even with modern large context windows (100,000+ tokens), dumping an entire project into a prompt produces worse results than providing structured, curated context. The AI does not need to see every file — it needs to understand the project’s architecture, conventions, and the specific area you are working in.
This is the problem that project instruction files solve — the CLAUDE.md and .github/copilot-instructions.md files we discussed at the end of Lecture 2. In that lecture, CLAUDE.md appeared as a way to stop repeating yourself: you encoded your diary format and commit conventions once, and the AI followed them every session. That was CLAUDE.md solving a scripting problem — eliminating boilerplate in a small, self-contained workflow.
Now the same file solves a much harder problem: giving the AI a structured map of an entire project. A brownfield CLAUDE.md encodes the architecture, the coding conventions, the test patterns, and — as we will see in the Definition of Done section below — the project’s quality gates themselves. When the Definition of Done says “all existing tests pass, new code has tests, documentation is updated,” those criteria can live directly in the CLAUDE.md, turning a human checklist into machine-readable instructions. The AI does not just know what the project looks like — it knows what “done” means in this project.
Notice the progression: CLAUDE.md was introduced for scripting automation, now it provides project context, and soon it will encode quality gates that the AI checks automatically. This is not accidental repetition — it is the same concept deepening with each use. We will use a project instruction file for the first time today, and by the end of this lecture you will see exactly how it connects to the expanded definition of done.
3.2.2 Tests Are Your Safety Net
In the Stack Overflow Challenge, tests were part of the SDLC workflow — you wrote them because Approach 3 told you to, and because they helped verify your implementation. They were aspirational.
In an existing codebase, tests are existential. The existing test suite is a contract: it encodes the expected behavior of the system. When you change code, the test suite tells you whether you kept that contract or broke it. “All tests pass” is not a nice-to-have — it is the minimum bar for any change you make.
This changes your workflow fundamentally. In greenfield, you might write code first and tests later (or never). In brownfield, pytest is your first and last command. Run it before you change anything to confirm the baseline. Run it after every change to confirm you did not break the contract.
3.2.3 Reading Trumps Writing
In greenfield, the primary activity is writing new code. In brownfield, the primary activity is understanding existing code.
Before you can change a function, you need to answer: What does it do? Who calls it? What happens if I change its return type? What assumptions does it make about its inputs? Is there documentation — and is that documentation accurate?
AI tools can help with this. “Explain this function,” “What calls this method?”, “What does this test verify?” — these are questions AI can answer quickly. But here is the critical caveat: the AI’s explanation is a hypothesis, not a fact. It may describe what the code “probably” does based on naming conventions rather than what it actually does. It may miss side effects, implicit state mutations, or non-obvious control flow. You must always verify the AI’s explanation against the actual code.
3.2.4 The Definition of Done Expands
In the Stack Overflow Challenge, “done” meant: the plot looks right and the code runs. That was sufficient for a self-contained exercise.
In a real project, “done” means much more:
| Criterion | Greenfield (SO Challenge) | Brownfield (Existing Project) |
|---|---|---|
| Tests | Optional, aspirational | All existing tests pass + new tests for new code |
| Coverage | Not measured | Measured, no regressions, new code covered |
| Performance | Not measured | No degradation; benchmarked if relevant |
| Code review | Not applicable | PR reviewed, description accurate |
| Documentation | Not applicable | Updated if behavior changed |
| Conventions | You chose them | You follow them |
| Git workflow | Free-form | Branch, commit, PR, merge |
| AI Diary | Recorded prompts | Recorded prompts + verified outputs |
This is not bureaucracy. Every item in the brownfield column exists because someone, somewhere, shipped a change that broke production and wished they had checked one more thing. The expanded definition of done is the scar tissue of real software teams.
Notice the last row: the AI Diary. In Lecture 2 we introduced a strict discipline — one commit per prompt, so that every AI interaction has a corresponding artifact in the git history. That discipline was designed for learning: it forces you to notice every interaction, judge every output, and build a traceable record of how AI contributed to your work.
But here is the tension: a real project’s git workflow may look very different. Many teams squash commits before merging a PR, so your twenty careful diary commits become a single merge commit. Some teams enforce conventional commits (feat:, fix:, chore:) where “diary entry” is not a valid prefix. The one-commit-per-prompt strategy, taken literally, can produce a noisy git history that conflicts with the project’s conventions.
This is not a contradiction — it is a spectrum you can now navigate deliberately. At one end: commit after every single prompt, including trivial ones (“fix typo”, “adjust import order”). This maximizes traceability but clutters the history. At the other end: work freely with AI across many prompts and commit only when you reach a meaningful milestone, recording the key interactions in a separate diary file. This produces a cleaner history but weaker prompt-artifact correspondence.
For this course, we stay closer to the strict end — because the learning value of tracking your AI interactions outweighs git aesthetics. But you should be aware that in a production project, you would adapt. The diary’s purpose is to make your AI usage visible and reviewable. How you achieve that — through granular commits, a separate diary document, or a hybrid — is a decision you make based on the project’s conventions. The important thing is that the correspondence exists in some form, not that it follows one rigid format.
3.2.5 Coding Conventions Are Pre-Existing
In the Stack Overflow Challenge, you set the style. You chose snake_case or camelCase, decided how to organize imports, picked your own commit message format. Every convention was yours.
In an existing project, the conventions are already established. The codebase uses a specific naming pattern. Imports follow a specific order. Docstrings use a specific format (Google-style, NumPy-style, reStructuredText). The git workflow follows a specific branching model. Your changes must match these conventions — even if you prefer something different.
This is where AI tools interact with conventions in a particularly interesting way. Without explicit context, AI will follow generic Python conventions (PEP 8), which may not match the project’s actual style. With a CLAUDE.md that specifies “this project uses Google-style docstrings and sorts imports with isort,” the AI-generated code is much more likely to match the existing codebase. But — and this is important — it is not guaranteed. During the preparation of this very course, AI-generated code contained PEP 8 violations despite a comprehensive CLAUDE.md that explicitly specified the linting conventions. Project instruction files improve compliance; they do not enforce it. This is why real projects use automated linting and CI checks as the second safety net — and you will see both in action today.
3.3 AI in Brownfield: More Useful AND More Dangerous
Here is the honest assessment of AI tools in existing codebases. They become more useful because there is more code to understand, more context to navigate, more patterns to follow. But they also become more dangerous because there is more to break, more conventions to violate, and more assumptions to get wrong.
Where AI excels in brownfield:
- Code explanation: “What does this function do?” — AI reads the code and produces a natural-language summary. Faster than reading the code yourself, but you must verify.
- Test generation: “Write tests for this module” — AI generates test cases that exercise existing code. Faster than writing them from scratch, but you must evaluate whether they test meaningful behavior.
- Refactoring suggestions: “This method is 45 lines long. How should I split it?” — AI proposes extraction patterns. But you must ensure the refactoring preserves behavior.
- Documentation: “Generate a docstring for this function based on the actual implementation” — AI drafts documentation. But you must check that it describes what the code does, not what it might do.
- Code navigation: “Trace how response time data flows from the HTTP handler to the HTML report” — AI follows the code path across files. But you must verify each step.
Where AI struggles in brownfield:
- Architectural decisions: AI does not understand why the architecture is the way it is. It may suggest changes that are locally sensible but violate broader design principles.
- Unwritten conventions: If the project has an implicit pattern that is not documented, the AI will not follow it.
- Side effects and state: AI may miss that a function mutates shared state, invalidates a cache, or triggers an event — especially dangerous in concurrent code.
- Legacy patterns: Some code exists for historical reasons (backward compatibility, workarounds for old bugs). AI may suggest “improvements” that break things.
- Scope control: AI tends to suggest larger changes than necessary. In brownfield, the safest change is the smallest one that achieves the goal.
Notice what these five struggles have in common: they are all things the project has committed to. The architecture was chosen deliberately. The conventions evolved for reasons. The legacy patterns exist because removing them would break real users. These are not arbitrary constraints — they are the accumulated decisions that define the project’s identity. They live in the team’s culture, in code review norms, in the institutional memory of long-tenured developers.
This is where project instruction files complete the circle. Once a committed decision is made explicit — written into a CLAUDE.md, encoded in a Definition of Done checklist, documented in an architecture decision record — AI becomes significantly better at following it. “Always use the existing StatsEntry class, never create a parallel stats structure” is exactly the kind of rule an AI can follow, across hundreds of generated lines, without getting tired or forgetting. But “better” is not “perfect.” Complex generation tasks can crowd out style and convention instructions — the AI focuses on producing correct logic and forgets the linting rules. This is why explicit instructions and automated enforcement (linters, pre-commit hooks, CI checks) work best as two complementary layers: the CLAUDE.md influences AI behavior, and the tooling catches what slips through. The struggles listed above are not permanent AI weaknesses. They are symptoms of implicit knowledge that has not yet been made explicit — and even once made explicit, they still benefit from automated enforcement.
There is a separate, more advanced question: what if the team wants to revisit a committed decision? “Should we really keep this legacy pattern, or is it time to migrate?” That is a strategic conversation, not a coding task — and AI can contribute to it as a discussion partner, surfacing trade-offs and exploring alternatives. But that use case is fundamentally different from day-to-day brownfield coding, and we will encounter it later in the course when we discuss AI-assisted architectural review.
The balanced message remains: AI is your best reading partner in a codebase you did not write. It can explain, suggest, generate tests, and draft documentation faster than you can alone. But it cannot replace your judgment about what is safe to change, what conventions to follow, and whether the explanation is actually correct. You are the safety net. The AI is the accelerator. And the more of your project’s committed decisions you make explicit — in instruction files, in checklists, in documentation — the more effectively the AI can work within those boundaries.
4. Entering the Locust Ecosystem
4.1 What Is Locust?
Today you will work inside a real open-source project: Locust. Locust is a Python load testing framework with approximately 25,000 stars on GitHub. You write user behavior scripts in Python, and Locust simulates thousands of concurrent users hitting your system — measuring response times, error rates, and throughput.
To simulate open-source contribution without risk, we have imported the Locust repository into our course organization: hs-aalen-software-engineering/locust. This is a full copy — not a fork — with the complete commit history (6,000+ commits, 200+ tags, all branches). It has no connection to the upstream repository: nothing you push will affect the real Locust project, and no upstream changes will appear in your copy. GitHub Actions are disabled to conserve our quota — you run tests locally instead. Branch protection on master requires one approving review before merging, just as it would in a real open-source project. You will create branches, open pull requests, and review each other’s work — the same workflow real contributors use.
Why Locust? Several reasons:
Performance IS the product. Unlike a typical web application where performance is a non-functional requirement, Locust’s entire purpose is measuring and generating load. When you change code in Locust, the question “did my change make it slower?” is not academic — it directly affects the tool’s core value proposition. This makes “measuring success” a natural part of the exercises, not an artificial add-on.
Right-sized codebase. The core of Locust is approximately 10,000 lines of Python, organized into clear modules. It is large enough that you cannot read everything in one sitting, but small enough that you can understand a single module within a class session.
It uses pytest. You already know pytest from your Software Engineering prerequisites. Locust’s test suite uses unittest.TestCase base classes with pytest as the runner — a common pattern in mature Python projects. You will not need to learn a new testing framework.
It is active. Locust is under active development with regular releases. You are working on something real, not an abandoned teaching toy.
4.2 The Locust Codebase at a Glance
When you clone the repository and open it in your editor, you will see a structure like this (simplified):
locust/
├── locust/                     # Core Python package
│   ├── __init__.py             # Public API + gevent monkey-patching
│   ├── main.py                 # CLI entry point
│   ├── env.py                  # Environment — central orchestration object
│   ├── runners.py              # LocalRunner, MasterRunner, WorkerRunner
│   ├── stats.py                # Request statistics and percentile calculation
│   ├── web.py                  # Flask web UI + REST API
│   ├── event.py                # EventHook pub/sub system
│   ├── clients.py              # HttpSession (requests wrapper with stats)
│   ├── user/                   # User model and task system
│   │   ├── users.py            # User, HttpUser base classes
│   │   └── task.py             # @task, @tag decorators, TaskSet
│   ├── contrib/                # Protocol-specific clients (mqtt, postgres, ...)
│   ├── rpc/                    # ZeroMQ master↔worker communication
│   ├── webui/                  # React + TypeScript frontend
│   └── test/                   # Test suite (~700 test methods)
├── docs/                       # Sphinx documentation
├── examples/                   # 40+ example locustfiles
├── pyproject.toml              # Project configuration
├── .github/
│   └── copilot-instructions.md # AI context for GitHub Copilot
├── CLAUDE.md                   # AI context for Claude Code (615 lines)
└── README.md
The modules you will work with most are:
stats.py— The statistics engine. Collects response times, calculates percentiles (median, p95, p99), aggregates data across requests. This is where performance metrics live.runners.py— Orchestrates load test execution. Manages spawning and stopping simulated users, distributing load in master/worker mode.web.py— The web interface and REST API. Serves the dashboard where you monitor a running load test and exposes endpoints for stats data.user/users.py— The base classes that users subclass to define their test scripts. Defines how simulated users wait, choose tasks, and handle responses. The@taskdecorator andTaskSetsystem live inuser/task.py.
Note that tests live inside the locust/ package at locust/test/, not in a separate top-level tests/ directory. This is different from the typical Python project layout — one of many conventions you will discover when exploring a new codebase.
You do not need to understand all of these today. For the exercises, you will focus on one module at a time — exactly as you would when joining a real project as a new team member.
4.3 Running the Test Suite
Prerequisites refresher: The rest of this lecture assumes familiarity with Git basics (commits, branches, staging area), feature branch workflows, and pull requests. If you need a refresher, see the Feature Branch Development lecture from the Software Engineering course. The key concepts you will need today: feature branches (feature/<description>), pull requests with reviews, and running tests locally before pushing.
The first thing you do in any existing project — before reading code, before asking the AI anything — is run the tests. This establishes your baseline: everything passes, the codebase is in a known-good state, and any future test failure is caused by something you did.
# Clone from the course organization (not the original repo)
git clone https://github.com/hs-aalen-software-engineering/locust.git
cd locust

# Install dependencies (Locust uses uv)
uv sync

# Run the full test suite
pytest locust/test/

# Run with coverage report
pytest --cov=locust --cov-report=term-missing locust/test/
When you run pytest --cov, you will see a coverage report showing which modules have high coverage and which have gaps. Those gaps are real — they represent code paths that no test exercises. Some of those gaps are exactly where you will be writing new tests in the exercises.
Remember: there is no CI in this teaching repository — GitHub Actions are disabled. You are the CI. Run tests before every push.
4.4 Running a Load Test
To understand what Locust does, you should also use it. Create a simple load test script that targets httpbin.org — a public service designed for testing HTTP clients:
httpbin.org is a public service that exists specifically for testing HTTP clients.
# locustfile.py
from locust import HttpUser, task, between

class QuickStartUser(HttpUser):
    wait_time = between(1, 3)
    host = "https://httpbin.org"

    @task
    def hello_world(self):
        self.client.get("/get")

    @task(3)
    def view_items(self):
        self.client.get("/headers")
Run it:
uv run locust -f locustfile.py
Open http://localhost:8089 in your browser. You should see the Locust web UI: a dashboard where you set the number of users, the spawn rate, and then watch real-time statistics — requests per second, response times, failure rates.
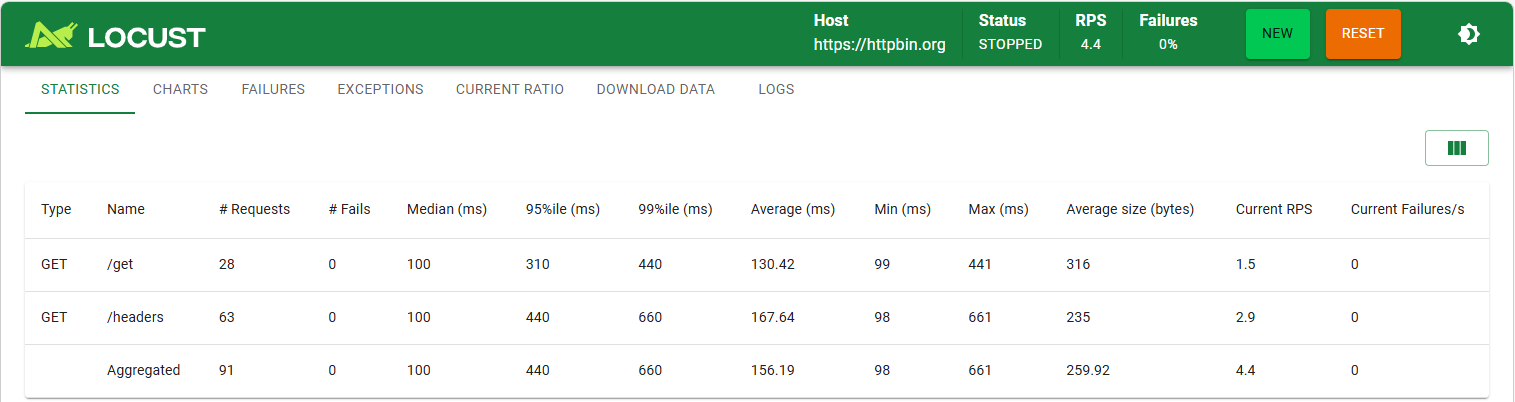
This is the product. This is what the code you are about to explore actually does. Set 10 users, spawn rate 2, start the test, and watch the numbers update. Use your AI tool to understand the metrics: what is a good response time? Why does RPS fluctuate? What happens when you increase the user count?
Note: If you see a raw text page instead of the dashboard, the React frontend has not been built. Ask your AI tool how to fix it — this is a real onboarding challenge. If the frontend build proves too difficult on your machine, skip ahead — the exercises are Python-only and do not require the web UI.
5. CLAUDE.md and Project Context
5.1 The Context Problem
You have just opened a 10,000-line codebase in your editor. You want your AI tool to help you understand and modify it. But here is the problem: the AI knows nothing about this project.
It has never seen the directory structure. It does not know that stats.py handles percentile calculation. It does not know that tests use unittest.TestCase base classes instead of pytest fixtures. It does not know that tests live inside locust/test/, not in a top-level tests/ directory. Without this context, the AI will:
- Give vague, generic answers about “what a stats module typically does”
- Generate tests that use the wrong import paths
- Write code in a style that does not match the existing codebase
- Invent fixtures and utilities that do not exist
You experienced a version of this problem in Lecture 2: every Prompt 0 had to specify the diary format because the AI does not remember conventions across sessions. In that case, you were repeating a 10-line format specification. In a 10,000-line codebase, the scale of the problem is entirely different — you cannot possibly paste all the relevant conventions into every prompt.
5.2 The Solution: Project Instruction Files
In Lecture 2, we introduced CLAUDE.md and .github/copilot-instructions.md as files that solve the repetition problem. Now you will see them in action — and not with a toy example, but with the real file already sitting in your Locust repository.
Remember the 45-line CLAUDE.md for the Stack Overflow Challenge from Section 2.3? That file was a map of a 250-line project you wrote yourself. Now open the CLAUDE.md in the Locust repository. It is over 600 lines long. Same concept — structured context for an AI assistant — but at a completely different scale. The Stack Overflow version had six short sections. The Locust version has a table of contents, collaboration principles, an architecture diagram, a “Key Files to Understand First” guide, testing details, git workflow conventions, common patterns, debugging tips, and a “What NOT to Touch” section. The difference in size reflects the difference in complexity: a brownfield CLAUDE.md does not just list files — it encodes architecture, conventions, workflows, and the traps that would catch a newcomer.
Here is what happens when you ask the same question, in the same codebase, with and without this file:
Without CLAUDE.md — asking Claude Code about the stats module:
You: What does the stats module do and how does it track response times?
     Show me the key data structures and their relationships.
The AI responds with a generic explanation: “The stats module likely collects timing data from HTTP requests and aggregates them into summary statistics. It probably uses some form of dictionary or counter to track per-endpoint metrics.” The answer is plausible but vague. It describes what a stats module might do, not what this stats module actually does. It does not mention specific classes, specific fields, or specific data flow patterns.
With CLAUDE.md — the same question:
The answer changes dramatically. The AI references StatsEntry and RequestStats by name, describes how StatsEntry.log() records response times and how they aggregate through StatsEntry.extend(), and traces the data flow from the event system through to the web UI. It knows the module structure because the CLAUDE.md told it what to expect.
Same AI. Same codebase. Same question. The only difference is 600 lines of structured context.
This is the prepared demonstration for today. The screenshots on the slide show the actual before-and-after responses. After you have set up your own project copy, you can replicate this experiment yourself — and you should. Seeing the difference in your own editor, with your own questions, is more convincing than any screenshot.
5.3 Anatomy of a Good CLAUDE.md
Rather than showing you a simplified mock-up, let us walk through the actual CLAUDE.md in your Locust repository. Open it now — it is in the project root. (If you use GitHub Copilot, the equivalent file is at .github/copilot-instructions.md.) Here is its structure:
| Section | What It Does | Why It Matters |
|---|---|---|
| Collaboration Principles | Tells the AI to be direct, understand before changing, research before implementing | These are behavioral instructions for the AI — not project documentation. They shape how the AI approaches your questions. |
| High-Level Overview | Architecture diagram, request data flow, runner hierarchy, concurrency model | Gives the AI the mental model it needs to answer architectural questions accurately. |
| Key Directories | Full directory tree with one-line descriptions of each file | Prevents the AI from inventing file paths or guessing where things live. |
| Key Files to Understand First | Ordered list of 10 files with explanations of what to look for in each | The brownfield onboarding guide. Your 45-line SO challenge version did not need this — four files need no reading order. Ten thousand lines of code do. |
| Commands | Exact commands for testing, linting, building the frontend | So the AI suggests the right commands, not generic ones. |
| Testing Details | Test organization, base classes, utilities, testing principles | Locust uses unittest.TestCase base classes, not pytest fixtures. Without this section, the AI would generate pytest-style tests that do not match the project. |
| Git Workflow | Branch naming, commit conventions, PR format | Encodes the contribution workflow for this teaching repository. |
| Common Patterns | Gevent greenlets, metaclass-based task collection, event-driven extension, control flow via exceptions | Architectural patterns a newcomer would not discover without reading deeply. The AI can now explain them when asked. |
| What NOT to Touch | Disabled workflows, built frontend artifacts, auto-generated version file | Context the AI cannot infer from the code. The workflow files exist in the repo, but Actions are disabled — without this note, the AI would tell you "CI will catch that." |
Compare this to the Stack Overflow Challenge CLAUDE.md: six sections, 45 lines, no table of contents, no collaboration principles, no debugging guide, no “what NOT to touch.” The difference is not verbosity — it is complexity. A 250-line project you wrote yourself needs a map the size of a sticky note. A 10,000-line project someone else wrote needs a field guide.
This structure is not something we invented for this course. React (244K stars), Deno (106K stars), Next.js (138K stars), and dozens of other major open-source projects now include similar files. The Locust CLAUDE.md was modeled after Deno’s CLAUDE.md for its structure and Foam’s CLAUDE.md for its collaboration philosophy — both real production files in active open-source projects.
Notice what is not in the file:
- Full file contents — the CLAUDE.md is a map, not a copy of the territory
- Implementation details that change daily — no line numbers, no internal variable names, nothing that goes stale after one commit
- Secrets or credentials — never commit these to any file in a repository
- Subjective preferences — “use descriptive variable names” is too vague. “Tests use
unittest.TestCasebase classes, not pytest fixtures” is actionable
5.4 What CLAUDE.md Does NOT Guarantee
Here is something that happened during the preparation of this course. We set up the Locust repository with a comprehensive CLAUDE.md — over 600 lines, including explicit instructions to run hatch run lint:format (the ruff linter) before committing and to create diary entries for every AI interaction. Then we asked the AI to generate a benchmark script. The result: the benchmark code worked correctly, but it contained multiple PEP 8 violations that the linter would have caught. When we asked the AI to fix those violations, it did — but it did not create a diary entry for that follow-up interaction, despite the diary convention being spelled out in the very CLAUDE.md it had read.
This is not a failure of the CLAUDE.md — it is a limitation of how project instruction files work. The CLAUDE.md is influence, not enforcement. When the AI is focused on a complex generation task (writing a benchmark script with multiple functions, fixtures, and output formatting), the “produce correct code” objective can outweigh the “follow lint rules” and “create diary entries” objectives. The instructions are still in the context, but they compete for the model’s attention with the immediate coding problem.
The practical lesson: CLAUDE.md and automated tooling are complementary layers, not alternatives.
- CLAUDE.md teaches the AI what to aim for — conventions, patterns, workflow expectations. It makes the AI significantly better. But it is probabilistic, not deterministic.
- Pre-commit hooks catch violations before they enter the repository. They run automatically on every
git commit— no human discipline required. The Locust repo already has this: open.pre-commit-config.yamland you will see ruff configured as a pre-commit hook. Every commit automatically runsruff check --fix(the linter) andruff-format(the formatter). If your code has PEP 8 violations, the commit is rejected. This is the enforcement layer that makes CLAUDE.md’s influence layer reliable. - CI pipelines (GitHub Actions, Jenkins, etc.) are the backup — they run the full test suite, coverage checks, and linting on every push or PR. In a professional project, nothing merges without CI passing. In our teaching repo, CI is disabled to save quota — which means the pre-commit hooks are your primary safety net.
- Your own discipline — checking “did I create a diary entry?” — remains the final layer for things automation cannot enforce. You are the human in the loop.
To activate the pre-commit hooks in your local clone:
pip install pre-commit
pre-commit install
After this, every git commit will automatically run ruff. You can also run it manually at any time — either via the command line (uv run ruff check . && uv run ruff format --check) or through the ruff extension in VS Code, which highlights violations in real time as you type.
In a professional project, all these layers work together: CLAUDE.md guides the AI, pre-commit hooks catch local mistakes, CI catches anything that slips through, and code review provides human judgment. Even in the age of AI-assisted coding, these automated checks remain essential — arguably more essential, because AI generates code faster than a human can manually review every line for style compliance.
Why does the AI sometimes ignore instructions it clearly received? You will learn the mechanistic answer in Act II, when we study how attention works and why context instructions are processed probabilistically, not as rules. For now, the takeaway is practical: trust but verify.
5.5 The Tool Equivalents
Different AI tools use different file names for the same concept:
| Tool | Instruction File | Location | Auto-loaded? |
|---|---|---|---|
| Claude Code | CLAUDE.md |
Project root | Yes, at session start |
| GitHub Copilot | .github/copilot-instructions.md |
.github/ directory |
Yes, when Copilot reads the repo |
| Cursor | .cursorrules |
Project root | Yes, at session start |
The principle is universal: encode your project context once, in a file that lives in the repository, and the AI tool reads it automatically. The file name differs across tools, but the content and purpose are identical.
The Locust repository includes a CLAUDE.md. If you use GitHub Copilot, the same content can be placed in .github/copilot-instructions.md — you saw both files side by side in the Stack Overflow Challenge repo earlier. The content is nearly identical; only the file name and location change.
5.6 Where This Fits in the Course
In Lecture 2, you heard about project instruction files but did not use them. Today, you receive a pre-configured CLAUDE.md and experience its effect firsthand. You do not need to write one yet — that comes in Act III, when we revisit this topic with deeper understanding.
This particular CLAUDE.md was not written casually. It was designed by studying how major open-source projects structure their own instruction files — projects like Deno (106K stars) for its progressive structure and Foam (16K stars) for its collaboration philosophy. In Act III, you will evaluate whether this CLAUDE.md is actually good, what is missing, and what you would change — once you understand how these files work at the token level. For now, just use it and notice the difference it makes.
But notice the progression: the structured thinking you practiced in Approach 3 — defining conventions, specifying formats, encoding process — is exactly what goes into a CLAUDE.md. You are already learning the skill. Today you see the tooling that automates its delivery.
6. Measuring Success in Existing Codebases
In the Stack Overflow Challenge, success meant: “the plot looks right.” That was a reasonable bar for a self-contained exercise. In an existing project, the bar is higher — and more precisely defined.
6.1 Tests Pass
The existing test suite is your contract with the codebase. After any change you make, the relevant tests must still pass.
In practice, you do not run the entire test suite after every change — in a large project that can take minutes or even hours. Instead, you run the tests for the modules you touched:
# Run only the tests relevant to your change (~8-22 seconds)
uv run pytest locust/test/test_stats.py -x -q

# Before pushing: run a broader subset to catch cross-module regressions
uv run pytest locust/test/test_stats.py locust/test/test_env.py \
  locust/test/test_locust_class.py -x -q
The -x flag stops on the first failure — fast feedback when iterating. The -q flag reduces noise. Your exercise package includes the exact test command for your modules.
If a test fails after your change, you broke a promise. Either your change is wrong, or the test was testing the old behavior intentionally. In both cases, you need to investigate before moving forward. And remember: there is no CI in this teaching repository — you are the CI. Run tests before every push.
6.2 Coverage Tells a Story
Test coverage (pytest --cov) shows what percentage of the code is executed by the test suite. It is not a perfect metric — 100% coverage does not mean 100% correct — but it tells you important things:
- Low coverage in a module means there are code paths no test exercises. These are blind spots where bugs can hide.
- Your new code should have tests. If you add a function, write tests for it. If you modify a function, ensure the existing tests still cover the modified behavior.
- High coverage with weak assertions is worse than low coverage. A test that calls a function and asserts
Truecovers lines but verifies nothing. We will return to this distinction in the exercises.
In a professional project, coverage is typically tracked automatically: CI generates a coverage report with every merged PR, and nightly builds produce a full project-wide report. Teams set coverage thresholds — if a PR drops coverage below the threshold, the build fails. In our teaching repo, CI is disabled, so you generate coverage reports locally. We have already analyzed the Locust codebase and identified specific modules with coverage gaps — your exercise packages include exact functions to test and the coverage percentages to beat.
6.3 Performance: Did You Make It Slower?
In a load testing framework, this question is particularly sharp. If your change to the stats module adds 5 milliseconds of processing per request, and Locust is handling 10,000 requests per second, you just added 50 seconds of overhead per second. That is not acceptable.
Not every change needs a formal benchmark. But you should develop the habit of asking: “Could this change affect performance? If so, how would I measure it?”
The Locust repository includes a benchmark script that measures operations per second for each exercise package’s refactoring target. The workflow is simple: run it before your change to capture a baseline, refactor, run it again, compare.
# Before your change — capture the baseline
uv run python benchmarks/run_benchmarks.py

# Make your change

# After your change — compare to baseline
uv run python benchmarks/run_benchmarks.py
The output is grouped by exercise package so you can find your numbers immediately. What do the numbers mean? Variations within ~10% are normal noise (CPU load, background processes). A consistent drop of 20% or more means your refactoring introduced overhead worth investigating — even if the tests still pass. Include both the before and after numbers in your PR description so reviewers can verify. The Brownfield Exercises document has a step-by-step guide with a concrete PR example.
6.4 Code Review and Pull Requests
Changes enter a codebase through pull requests (PRs). A PR is not just a code submission — it is a communication artifact. The PR description explains:
- What changed (the diff is right there, but a human-readable summary helps)
- Why it changed (motivation, issue reference, user request)
- How to test (steps to verify the change works as intended)
AI can help draft PR descriptions — and you should try it. But as with everything else, you must verify that the description accurately reflects what you actually changed. AI-generated PR descriptions have a tendency to describe what the code should do rather than what it does.
If you have not worked with pull requests before, see the Feature Branch Development lecture for the full PR lifecycle: opening, reviewing, requesting changes, and merging.
6.5 The AI Diary in a Shared Codebase
In Lecture 2, you kept an AI Diary for the Stack Overflow Challenge: a flat sequence of numbered entries in a diary/ folder, one per development step. That worked for a solo project. In a shared codebase with dozens of contributors working on concurrent branches, the same approach would produce a mess of conflicting file numbers and tangled merge histories.
The Locust repository uses a branch-based diary structure:
diary/
├── README.md                              # Explains the approach
├── feature/add-retry-logic/               # One subfolder per branch
│   ├── 001-explore-existing-retry.md
│   ├── 002-implement-retry-decorator.md
│   └── 003-add-tests.md
├── fix/stats-percentile-bug/
│   └── 001-investigate-and-fix.md
└── ...
Each entry follows a template you will find in the project instruction files (CLAUDE.md and .github/copilot-instructions.md) — date, tool, model, iteration count, and the full prompt text. The key change from Lecture 2: every diary entry is committed together with the code it documents. When you use AI to generate a test, the commit contains both the test file and the diary entry that produced it. Commit messages use the prefix [diary] so they are easy to filter:
# See all AI-assisted contributions
git log --grep='\[diary\]'
Why does this matter? Three reasons:
Transparency. In a team, your colleagues can see not just what you changed but how you got there. A PR reviewer who reads your diary entries can evaluate whether the AI was used thoughtfully or blindly.
Reproducibility. If someone wants to understand a piece of AI-generated code six months from now, the diary entry shows the exact prompt that produced it — not a vague “I asked the AI to write tests.”
Learning. When you review your own diary after a session, patterns emerge: which prompts worked, which needed three follow-ups, which produced code you had to rewrite entirely. This self-awareness is the skill that separates effective AI users from ineffective ones.
6.6 The Definition of Done Checklist
For every exercise in this lecture, “done” means:
- All existing tests pass (no regressions) — run your package’s test command
- New tests check actual behavior (not just line coverage)
- Code passes the linter — activate pre-commit hooks (
pre-commit install) so ruff runs automatically on every commit, or use the ruff VS Code extension for real-time feedback, or runuv run ruff check . && uv run ruff format --checkmanually. AI-generated code frequently has style violations even with a CLAUDE.md — automation catches what instructions miss. - Refactored code preserves the original method’s contract — same signature, same return values, same side effects
- Performance not degraded —
make benchmarkbefore and after, numbers in the PR - Commit messages are clear and meaningful —
[diary]prefix for AI-assisted commits - AI Diary entries document the full process — prompts, iterations, what you accepted vs rejected
This checklist is also encoded in the CLAUDE.md and .github/copilot-instructions.md in the Locust repository — your AI tool reads it and will remind you if you ask. The exercises use the same criteria in their rubric.
7. The Brownfield Tasks
You will work on the Locust codebase in teams of 3-5 students. Each team is assigned a specific exercise package — a set of modules, test targets, and a refactoring goal. You will improve test coverage and refactor real production code, using AI to accelerate the work.
The exercises are split into two documents:
- Locust Exploration — In-class onboarding: setup, run a load test, AI as mentor, create your branch and first diary entry
- Brownfield Exercises — Graded assignment: test coverage targets, refactoring, PR deliverables with rubric
The rest of this section gives an overview. The exercise documents contain the full details, example prompts, and rubric.
Every task uses the AI Diary: create a feature branch, document your prompts in diary/<branch-name>/, and commit diary entries alongside the code they produced.
7.1 Getting Started (In-Class, ~20 Minutes)
You already set up the repo and ran a load test in Section 4. Now it is time to start working. First, create your team’s feature branch and open your AI tool. If you are new to feature branches and the feature/<description> naming convention, see the Feature Branch Development lecture for the full workflow.
# Create your team's branch
git checkout -b feature/<team-name>-<task>
# Example: feature/team3-stats-coverage

# Create your diary subfolder
mkdir -p diary/feature/<team-name>-<task>
Open VS Code in the project directory. Your AI tool — whether Claude Code or GitHub Copilot — will automatically read the project instruction file (CLAUDE.md or .github/copilot-instructions.md). Try a quick test:
You: What does the stats module do? Show me the key classes.
If the answer references specific class names (StatsEntry, RequestStats, etc.) rather than giving a generic description, the instruction file is working. This is your first skill in brownfield AI development: asking the AI to explain code you have not read yet, then verifying whether the explanation is accurate. AI is a powerful onboarding accelerator — but even with a 600-line project context file, verification is still necessary.
Diary: Your first entry documents what you asked the AI about your assigned module and what you learned. This is the beginning of your branch’s diary.
7.2 Your Exercise Package
Each team is assigned one of three packages. The packages are designed around modules with fast test suites (under 25 seconds) so you get quick feedback loops on any machine.
7.2.1 Package A: Pure Python Utilities (Easiest)
Module focus: locust/util/ + locust/log.py
Test command (~8 seconds):
uv run pytest locust/test/test_util.py locust/test/test_log.py \
  locust/test/test_taskratio.py -x -q
Coverage targets — write tests for:
-
util/cache.py— thememoize()decorator (currently 10% coverage). This is a self-contained, pure Python decorator with zero external dependencies. Write tests for: cache miss, cache hit, timeout expiry,dynamic_timeoutdoubling, andclear_cache(). Target: 10% to near 100%. -
util/exception_handler.py— theretry()decorator (currently 54% coverage). Only the happy path is tested. Write tests for: success on first try, success on retry, failure after all retries, custom exception filtering. Target: 54% to near 100%. -
user/inspectuser.py—_calc_distribution()(currently 60% coverage). Pure computation with simple User class stubs. Write tests for: equal weights, mixed weights,fixed_countusers, zero users edge case. Target: 60% to ~80%.
Refactoring target: log.py:setup_logging() (54 lines). The function builds a config dictionary and conditionally adds a file handler. Extract _build_base_config() and _add_file_handler() — three functions of ~15 lines each instead of one 54-line function. Existing tests in test_log.py provide your safety net.
Estimated time: 60-75 minutes with AI assistance.
7.2.2 Package B: Statistics and Reporting (Medium)
Module focus: locust/stats.py + locust/html.py
Test command (~22 seconds):
uv run pytest locust/test/test_stats.py locust/test/test_html_filename.py -x -q
Coverage targets — write tests for:
-
stats.py—StatsError.parse_error()(lines 715-729). Write tests for: plain string errors, errors with hex addresses (the0x....replacement logic), errors without>closing. The hex replacement is a specific, testable behavior. -
stats.py—StatsError.to_name()andStatsError.serialize()(lines 739-766). Write tests for: string errors,CatchResponseErrorunwrapping, object errors. These are self-contained methods. -
html.py—get_html_report()(currently 34% coverage, no dedicated test file). Write the first tests for this function. You will need to mockEnvironmentandRunner, but the logic itself is straightforward template data assembly: time range, host resolution, user counts. This is a great opportunity to see AI test generation in action on a completely untested module.
Refactoring target: stats.py:StatsEntry.extend() (43 lines). This method merges two StatsEntry objects with four repetitive operations: merging response times, merging request counts, merging error dicts, and updating the cache. Extract _merge_response_times(), _merge_num_reqs_per_sec(), and _maybe_cache_response_times(). The 62 passing tests in test_stats.py are your safety net.
Estimated time: 75-90 minutes with AI assistance.
7.2.3 Package C: User Model and Tasks (Medium)
Module focus: locust/user/ + locust/debug.py
Test command (~9 seconds):
uv run pytest locust/test/test_tags.py locust/test/test_locust_class.py \
  locust/test/test_users.py locust/test/test_debugging.py -x -q
Coverage targets — write tests for:
-
user/task.py—filter_tasks_by_tags()(lines 186-226, currently 91% coverage). Write tests for edge cases the existing suite misses: empty tag sets, tasks with no tags, overlapping include and exclude tags. Target: 91% to ~95%. -
user/users.py—HttpUser.__init__()pool manager config (currently 81% coverage). Write tests for: custompool_managersettings,concurrencyparameter effect, SSL verification flag. -
debug.py—PrintListener.on_request()(currently 45% coverage). Write tests for: successful requests, failed requests with different exception types,include_time/include_lengthflags. This is a self-contained listener class.
Refactoring target: user/task.py:filter_tasks_by_tags() (41 lines). Extract _task_matches_tags(task, include_tags, exclude_tags) -> bool as a pure function. The 15 passing tests in test_tags.py (91% coverage) give you an excellent safety net.
Estimated time: 70-85 minutes with AI assistance.
7.3 The Refactoring Constraints
When you reach the refactoring part of your package, these rules apply:
- All existing tests must pass without modification. If a test breaks, your refactoring changed behavior — fix the refactoring, not the test.
- The public API must not change. Same method signature, same return values, same side effects.
- Run the performance benchmark before and after. Use
make benchmarkto confirm your refactoring did not degrade performance. Include the before/after numbers in your PR description.
AI is good at suggesting refactoring patterns — extract method, rename, restructure. But ensuring semantic equivalence — that the refactored code does exactly what the original did — requires careful thought and the safety net of your test suite. This is where the coverage tests you just wrote pay off: the more thoroughly you tested the original behavior, the more confidently you can refactor.
7.4 Deliverables
For each team, submit one PR against master containing:
- Your new test files with coverage improvements
- The refactored method(s) with no behavior changes
- Performance benchmark numbers (before/after) in the PR description
- Diary entries in
diary/<branch-name>/documenting each AI interaction - A PR description explaining what you changed and why
7.5 How the Tasks Connect
Notice the progression within each package:
- Explore — ask the AI about your assigned module, compare to
CLAUDE.md - Test — write tests for specific uncovered functions using AI assistance
- Refactor — improve a long method, using your new tests as a safety net
This mirrors how a new team member engages with an existing codebase: first understand, then verify your understanding, then contribute. The tests you write are not just an exercise — they become the foundation that makes your refactoring safe.
8. Quick Reference
8.1 Team assignments
Your instructor will assign your team to Package A, B, or C. Each package has its own module focus, test targets, and refactoring goal — see Section 7.2 for full details.
8.2 Fast test commands
| Package | Command | Runtime |
|---|---|---|
| A (Utilities) | uv run pytest locust/test/test_util.py locust/test/test_log.py locust/test/test_taskratio.py -x -q |
~8s |
| B (Statistics) | uv run pytest locust/test/test_stats.py locust/test/test_html_filename.py -x -q |
~22s |
| C (User Model) | uv run pytest locust/test/test_tags.py locust/test/test_locust_class.py locust/test/test_users.py -x -q |
~9s |
8.3 Definition of Done
Every PR is complete when:
- All existing tests pass (no regressions)
- New tests check actual behavior (not just line coverage)
- Refactored code preserves the original method’s contract
- Performance not degraded (benchmark numbers in PR)
- Commit messages are clear and meaningful
- AI Diary entries record the full process
9. What You Learned Today
Let us revisit the confidence question from the feedback quiz at the start of this session. You rated your confidence for working in unfamiliar code — probably lower than for greenfield. After today:
- You have opened a 10,000-line codebase, run its tests, explored its structure, and started contributing — all within one session.
- You experienced firsthand how
CLAUDE.mdchanges the quality of AI assistance. Same tool, same code, dramatically different results. - You learned the five key differences between greenfield and brownfield: context, tests, reading, definition of done, and conventions.
- You have a concrete checklist for “done” in a professional codebase: tests pass, coverage maintained, performance preserved, PR reviewed, diary complete.
The brownfield tasks continue after today. Your team should have completed the Locust Exploration exercise and started on your assigned package from the Brownfield Exercises during this session. The remaining coverage targets and the refactoring task are due before the next lecture. Every step builds on the previous one: the exploration forces you to read, the tests verify what you read, and the refactoring proves you can change code safely — with AI accelerating each step.