03 Locust Exploration: Getting Your Hands on a Real Codebase
March 2026 (1497 Words, 9 Minutes)
Goal
In this exercise you will clone a real open-source Python project — Locust, a load testing framework — and start exploring it with the help of your AI coding assistant. By the end, you will have:
- Set up the project locally and run its tests
- Run a load test to see what the software actually does
- Used your AI tool as an onboarding mentor to understand the architecture
- Created your team’s feature branch and first diary entry
This is your first encounter with brownfield development — working inside a codebase someone else wrote.
Part 1: Clone and Set Up
Step 1: Clone the Course Repository
We work on a teaching copy of Locust in our course organization — not the original repo. This is a full import with the complete commit history, isolated so your work does not affect the real project.
git clone https://github.com/hs-aalen-software-engineering/locust.git
cd locust
Step 2: Install Dependencies
Locust uses uv as its package manager:
uv sync
If this fails, your AI assistant can help you troubleshoot. Common issues:
uvnot installed — see docs.astral.sh/uv for installation- Missing Python version (Locust requires Python 3.10+)
geventbuild errors on Windows — requires Visual Studio Build Tools with “C++ build tools” workload
This is intentional. Getting someone else’s project to build locally is a real skill. Use your AI tool to debug any setup issues — and note what you had to fix.
Step 3: Activate Pre-Commit Hooks
The Locust repo includes pre-commit hooks that automatically run ruff (linter + formatter) on every git commit. Activate them:
pip install pre-commit
pre-commit install
From now on, every commit will be checked for PEP 8 violations before it enters the repository. If the check fails, the commit is rejected and the violations are shown. This is your primary code quality safety net — especially important because AI-generated code frequently contains style violations even when the CLAUDE.md specifies the conventions.
You can also install the ruff extension for VS Code for real-time feedback as you type.
Step 4: Verify That pytest Works
Do not run the full test suite — some files take over 2 minutes and may fail due to environment differences. Instead, pick one of the following test files and run it to confirm your setup works:
uv run pytest locust/test/test_env.py -x -q
uv run pytest locust/test/test_tags.py -x -q
uv run pytest locust/test/test_users.py -x -q
uv run pytest locust/test/test_wait_time.py -x -q
uv run pytest locust/test/test_util.py -x -q
If the tests pass, you are in a known-good state. Every failure from now on is caused by something you did.
Note: tests live inside the locust/ package at locust/test/, not in a separate top-level tests/ directory. This is one of many conventions you discover when exploring a new codebase.
Part 2: See What the Software Does
Before reading any source code, use the product. Create a simple load test script that targets httpbin.org — a public test service designed for exactly this purpose:
httpbin.org is a public service that exists specifically for testing HTTP clients.
# locustfile.py
from locust import HttpUser, task, between

class QuickStartUser(HttpUser):
    wait_time = between(1, 3)
    host = "https://httpbin.org"

    @task
    def hello_world(self):
        self.client.get("/get")

    @task(3)
    def view_items(self):
        self.client.get("/headers")
Run it:
uv run locust -f locustfile.py
Open http://localhost:8089 in your browser. You should see the Locust web UI — a dashboard where you set the number of users, the spawn rate, and watch real-time statistics in real time:
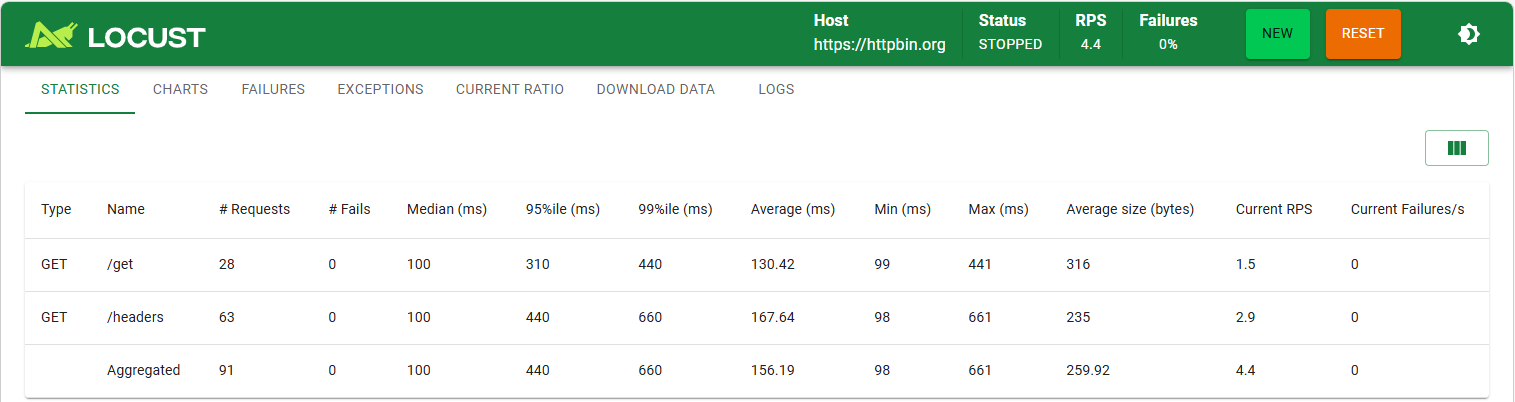
Explore the product. Set 10 users, spawn rate 2, and start the test. Watch the dashboard update. Use your AI tool to understand what you are seeing:
- “What does ‘requests per second’ mean in this context?”
- “Is a median response time of 150ms good or bad?”
- “Why does the RPS fluctuate?”
- “What happens if I increase the user count to 50?”
This is about getting a feeling for what the software produces — not the code behind it. You are the user right now.
If the web UI looks broken
If you see a raw text page or a blank page instead of the dashboard shown above, the React frontend has not been built. The web UI is a React application that needs to be compiled before it can be served.
This is your first AI-assisted debugging challenge. Ask your AI tool:
“I ran locust and opened localhost:8089, but I see a raw/broken page instead of the dashboard. How do I fix this?”
The AI will guide you through installing Node.js, Yarn, and building the frontend. Follow its instructions.
If the frontend build does not work on your machine (outdated OS, missing build tools, corporate firewall), do not spend more than 15 minutes on it. The frontend is not required for the test-writing and refactoring exercises — those are pure Python. Skip to Part 3 and focus your energy there.
Part 3: AI as Onboarding Mentor
This is a new skill — obvious but worth making explicit. Open Claude Code or GitHub Copilot in the project directory. The AI tool will automatically read CLAUDE.md (or .github/copilot-instructions.md).
Ask your AI tool these onboarding questions:
- “What is the high-level architecture of this project?”
- “How does a user request flow from the @task method to the stats report?”
- “What are the most important files to read first?”
Now open the CLAUDE.md file and compare the AI’s answers to what it describes. Where does the AI add detail beyond the CLAUDE.md? Where does it get something wrong?
This teaches two things:
- AI is a powerful onboarding accelerator — you learned more about this codebase in 5 minutes than you would in an hour of reading
- Even with a 600-line project context file, verification is still necessary
Part 4: Create Your Branch and Diary
Create your team’s feature branch
git checkout -b feature/<team-name>-<task>
# Example: feature/team3-stats-coverage
Create your diary subfolder
mkdir -p diary/feature/<team-name>-<task>
Write your first diary entry
Create diary/feature/<team-name>-<task>/001-onboarding.md with this template:
# 001 — Onboarding and Exploration

**Date**: YYYY-MM-DD
**Tool**: [Claude Code / GitHub Copilot / ...]
**Model**: [model name]
**Iterations**: [number]

## Prompt

**YYYY-MM-DD HH:MM**

[The onboarding questions you asked the AI]

## What I Learned

- [Key architectural insights]
- [What the AI got right vs wrong]
- [Setup issues encountered and how you solved them]
Commit your first entry:
git add diary/
git commit -m "[diary] 001 — Onboarding and exploration"
Deliverables
- A working local setup —
uv syncsucceeded, at least one test file passes - Your team’s feature branch with diary subfolder created
- First diary entry (
001-onboarding.md) documenting your AI-assisted exploration
Tips
- Start with the CLAUDE.md. It is your map. Read it before asking the AI random questions.
- If you get stuck on setup, that IS the exercise. Real-world brownfield development always starts with “how do I even run this?” Use your AI tool to get unstuck.
- Do not run
pytest locust/test/(full suite). Some test files take 2+ minutes and have pre-existing failures from environment differences. Pick one of the individual test files listed above. - Remember: you are the CI. GitHub Actions are disabled in this teaching repo. Run tests locally before every push.