01 Modern Development Tools: Implementation Skills for Modern Software Development
October 2025 (6802 Words, 38 Minutes)
12. From Scripts to Professional Software: The Modern Implementation Journey
Welcome to Part 2 of our first lecture! Now that you’ve established your development environment with Git, GitHub, VS Code, and Copilot, it’s time to dive into the heart of software engineering: implementation.
Writing code is exciting—it’s where ideas transform into reality. But there’s a vast difference between writing a script that works on your laptop and building professional software that scales, maintains quality, and collaborates well with teams. This lecture will show you that journey.
12.1 What You’ll Learn
In this part of the course, we’ll explore:
- Why Python is the essential language for modern software developers
- The evolution from simple scripts to professional projects
- Modern tooling with uv—the cutting-edge Python package manager
- Industry practices that separate hobbyist code from production software
- Project structure that enables teams and long-term maintenance
This is a teaser for the journey ahead. Throughout this course, we’ll take a hands-on, example-driven approach, starting with simple scripts and evolving them into a fully professional Python project using 2025’s best practices.
13. Why Python? The Inevitable Choice for Modern Developers
If you’re going to learn one programming language deeply in 2025, Python should be it. This isn’t subjective preference—it’s backed by overwhelming evidence from industry and academia.
13.1 Python’s Dominance: The Numbers Don’t Lie
Let’s look at the quantitative evidence:
13.1.1 Industry Adoption
GitHub Statistics (2024-2025):
- 19.8 million repositories use Python as their primary language [1]
- 2nd most popular language on GitHub (after JavaScript) [2]
- 27% of all active repositories include Python code [2]
- Fastest-growing major programming language year-over-year [3]
Stack Overflow Developer Survey 2024:
- 51% of professional developers use Python [4]
- #1 language developers want to learn [4]
- #2 most loved language among professionals [4]
- Highest paid language skill in data science and machine learning roles [4]
TIOBE Index (October 2025):
- #1 programming language globally [5]
- Held top position consistently since 2021 [5]
- 15.2% market share (next closest: C++ at 10.9%) [5]
13.1.2 Academic Dominance
Research and Education:
- Top 10 universities worldwide teach Python as the primary language in CS101 [6]
- 82% of data science and machine learning papers use Python for implementations [7]
- arXiv.org shows Python in 94% of recent AI/ML research code repositories [8]
- Most cited programming language in academic papers (2020-2025) [9]
Scientific Computing:
- NumPy, SciPy, Pandas: Used in 90%+ of scientific Python projects [10]
- Jupyter Notebooks: Over 10 million public notebooks on GitHub [11]
- Nature, Science: Python mentioned in 73% of computational papers (2024) [12]
13.2 Why Python Wins: Technical and Practical Reasons
The numbers tell us that Python dominates, but why does it dominate?
13.2.1 Readability and Productivity
Python’s syntax is as close to pseudocode as you can get:
# Python - reads like English
def calculate_average(numbers):
    """Calculate the average of a list of numbers."""
    return sum(numbers) / len(numbers)

students = [85, 92, 78, 90, 88]
average = calculate_average(students)
print(f"Average grade: {average}")
Compare this to equivalent code in other languages—Python wins on clarity and development speed.
13.2.2 Versatility: One Language, Every Domain
Python isn’t just for one thing—it’s for everything:
- Web Development: Django, Flask, FastAPI
- Data Science: Pandas, NumPy, Matplotlib
- Machine Learning: TensorFlow, PyTorch, scikit-learn
- Automation: Scripting, DevOps, system administration
- Scientific Computing: SciPy, SymPy, Biopython
- Game Development: Pygame, Panda3D
- Desktop Applications: PyQt, Tkinter
- Embedded Systems: MicroPython, CircuitPython
Career Impact: Learn Python once, work in any domain.
13.2.3 Ecosystem: Batteries Included and Beyond
Standard Library: Python comes with 200+ built-in modules for common tasks—file I/O, networking, data structures, concurrency, and more.
- 500,000+ packages available [13]
- 5 billion downloads per month [13]
- Package for virtually any problem you can imagine
Example: Need to work with dates, send HTTP requests, process JSON, and create a GUI?
# All built-in or one command away
uv add requests  # That's it for HTTP
# datetime, json, tkinter - already included
13.2.4 Community and Support
- Stack Overflow: 2.1 million Python questions (most of any language) [14]
- Python.org: Extensive official documentation
- Real Python, Python Weekly: Regular tutorials and updates
- PyCon: Annual conference with thousands of attendees globally
- Local meetups: Python user groups in every major city
When you’re stuck, there’s always help available.
13.2.5 Industry Demand and Career Growth
Job Market (2025):
- Python Developer: Highly competitive salaries across all markets [15]
- Data Scientist (Python-focused): Among the top-paid technical roles [15]
- Machine Learning Engineer: Premium compensation with strong growth trajectory [15]
- Global Demand: Tens of thousands of open positions requiring Python skills [16]
Companies Using Python:
- Tech Giants: Google, Facebook, Netflix, Spotify, Uber [17]
- Finance: JPMorgan, Goldman Sachs, Bloomberg [17]
- Science: NASA, CERN, SpaceX [17]
- AI Leaders: OpenAI, DeepMind, Anthropic [17]
13.3 The AI and Machine Learning Revolution
We’re living through an AI revolution, and Python is the language of AI:
- PyTorch and TensorFlow: The dominant ML frameworks, both Python-native [18]
- Hugging Face: The AI model hub—primarily Python [19]
- LangChain, LlamaIndex: LLM application frameworks—Python [20]
- OpenAI API, Anthropic API: Python SDKs are first-class citizens [21]
If you want to work with cutting-edge AI (and you should—it’s transforming every industry), Python isn’t optional.
13.4 Python for Academic Success
In academic contexts, Python offers unique advantages:
Research Reproducibility:
- Jupyter Notebooks combine code, results, and narrative
- Easy to share and reproduce experiments
- Version control friendly (with proper tools)
Rapid Prototyping:
- Test hypotheses quickly
- Iterate on algorithms without compilation overhead
- Focus on logic, not boilerplate
Collaboration:
- Readable code means colleagues understand your work
- Large ecosystem means existing solutions for common problems
- Standard tooling (like uv, which we’ll explore) enables team coordination
13.5 The Bottom Line
Python is inevitable for modern developers because:
- ✅ Ubiquitous: Used everywhere, from startups to NASA
- ✅ Productive: Write less code, accomplish more
- ✅ Versatile: One language for web, data, AI, automation
- ✅ In-demand: Top salary, most job openings
- ✅ Future-proof: Leading AI/ML language, constantly evolving
- ✅ Beginner-friendly: Learn programming concepts, not syntax quirks
- ✅ Professional-grade: Scales from scripts to enterprise systems
Whether you’re building a research prototype, a startup MVP, or enterprise software, Python is the right choice.
14. The Journey Ahead: From Scripts to Professional Projects
Throughout this course, we’ll take you on a practical, hands-on journey. We’ll start with something you might already be familiar with—simple Python scripts—and evolve it step-by-step into a fully professional project using 2025’s best practices.
15. From Script to Production — The Professional Gap
15.1 The Two Pythons
Script Python (What tutorials teach):
# analysis.py
import pandas as pd

data = pd.read_csv("data.csv")
result = data.describe()
print(result)
python analysis.py # Works... for now
Production Python (What companies need):
Same functionality, professional structure:
# src/analytics/__init__.py
"""Analytics package for data processing."""
__version__ = "1.2.3"

# src/analytics/pipeline.py
import pandas as pd
from pathlib import Path

def analyze_data(file_path: Path) -> pd.DataFrame:
    """Analyze data from CSV file and return statistics.

    Args:
        file_path: Path to CSV file

    Returns:
        DataFrame with statistical summary
    """
    data = pd.read_csv(file_path)
    return data.describe()

# src/analytics/cli.py
import typer
from pathlib import Path
from analytics.pipeline import analyze_data

app = typer.Typer()

@app.command()
def analyze(file: Path) -> None:
    """Analyze data from CSV file."""
    result = analyze_data(file)
    print(result)

if __name__ == "__main__":
    app()
# Modern uv workflow - proper packaging
uv tool install analytics-platform
analytics-cli analyze data.csv

# Or run directly without installing
uv run analytics-cli analyze data.csv
15.2 What Changes at Scale?
15.2.1 Multiple People, Multiple Months
- Problem: “It works on my machine” ≠ “It works in production”
- Solution: Reproducible environments, dependency management
- Tool:
uv(modern) vspip+venv(traditional)
15.2.2 Code Lives Beyond Your Laptop
- Problem: How do you distribute your code?
- Solution: Build packages, publish to registries
- Tool: Build backends (what we’re learning today)
15.2.3 Quality Matters
- Problem: Bugs in production cost money
- Solution: Testing, linting, type checking
- Tools:
pytest,ruff,pyright
15.2.4 Collaboration at Scale
- Problem: 10 developers changing code simultaneously
- Solution: Standardized project structure, automation
- Tools: CI/CD, pre-commit hooks, workflows
15.3 Your First Professional Python Project: Road Profile Viewer
Time to get hands-on! Instead of building from scratch, we’ll start with real, working code and transform it step-by-step into a professional Python project.
15.3.1 Step 1: Download the Starting Code
For course students:
- Go to Canvas: Visit the course page
- Download: Get the file
road-profile-viewer.7z - Extract: Unzip the archive to see the code structure
For external users without Canvas access:
- Go to GitHub: Visit the Road Profile Viewer v1.0.0 release
- Download: Get the source code archive (zip or tar.gz)
- Extract: Unzip the archive to see the code structure
What you’ll find:
- Python scripts for visualizing road elevation profiles
- Sample data files
- Basic functionality that works… but could be much better
This is Script Python - the kind of code tutorials teach. Our mission: transform it into Production Python.
📦 “Wait, didn’t we just say Git is better than zipped files?”
Yes! And you’re right to notice. Normally, you’d clone a repository directly from GitHub. But for this first exercise, we’re deliberately having you:
- Start with a zip file (the “old way”)
- Initialize Git yourself
- Create your own GitHub repository
- Connect and push
Why? Because doing it once yourself teaches you how repositories are born. After this, you’ll always clone existing repos—but you’ll understand what’s happening under the hood. Think of it as learning to ride a bike with training wheels before joining the Tour de France! 🚴
15.3.2 Step 2: Set Up Your Local Environment
Open your terminal and create your project workspace:
# Create a dedicated folder for your project
mkdir road-profile-viewer
cd road-profile-viewer

# Copy the extracted files here
# (Use your file manager or copy commands)
15.3.3 Step 3: Customize the Project Configuration
Before we commit the code, let’s make it yours! Open the pyproject.toml file in VS Code:
# Open the project in VS Code
code .
Edit pyproject.toml:
- Find the
authorssection (around line 6) - Replace
L3GJ0Nwith your GitHub username - Replace the email with your own email address
Example change:
# Before (what you downloaded):
authors = [{name = "L3GJ0N", email = "dominik.rother@hs-aalen.de"}]

# After (your version):
authors = [{name = "YOUR_GITHUB_USERNAME", email = "your.email@example.com"}]
💾 Save the file (Ctrl+S or Cmd+S)
Why this matters: This makes you the official author of your version of the project. When you publish packages or contribute to open source, proper attribution is crucial!
15.3.4 Step 4: Initialize Git Repository
Now let’s turn this code into a proper Git repository:
# Initialize Git in your project folder
git init

# Add all files to staging
git add .

# Create your initial commit
# IMPORTANT: Use this exact message so everyone starts the same
git commit -m "Initial commit: Road profile viewer scripts"

# Check your status
git status
🎯 Checkpoint: You now have a local Git repository with your first commit!
15.3.5 Step 5: Create GitHub Repository
- Go to GitHub: Visit github.com and sign in
- Create New Repository:
- Click the ”+” button → “New repository”
- Repository name:
road-profile-viewer - Description:
Python tool for visualizing road elevation profiles - Visibility: Public (so you can showcase your work!)
- ⚠️ Important: Do NOT initialize with README, .gitignore, or license
- Click “Create repository”
15.3.6 Step 6: Connect Local to GitHub
GitHub will show you instructions, but here’s exactly what to do:
# Add your GitHub repository as remote origin
git remote add origin https://github.com/YOUR_USERNAME/road-profile-viewer.git

# Push your code to GitHub
git branch -M main
git push -u origin main
Replace YOUR_USERNAME with your actual GitHub username!
15.3.7 Step 7: Verify Everything Works
- Refresh your GitHub repository page - you should see your code!
- Check the commit message - it should say “Initial commit: Road profile viewer scripts”
- Explore the files - click around to see your code on GitHub
🎉 Success! You now have:
- ✅ Working Python code on your machine
- ✅ Git version control set up
- ✅ Code backed up on GitHub
- ✅ Foundation for professional development
16. Running Your First Modern Python Application
Now let’s see your code in action! We’ll use uv - the modern Python tooling that makes running projects effortless.
16.1 Step 1: Install uv
Choose your operating system:
Windows (PowerShell):
Open PowerShell and run:
powershell -ExecutionPolicy ByPass -c "irm https://astral.sh/uv/install.ps1 | iex"
⚠️ Important for Windows: After installation, close and reopen your PowerShell/terminal window for the PATH changes to take effect.
Ubuntu/Linux:
Open your terminal and run:
curl -LsSf https://astral.sh/uv/install.sh | sh
⚠️ Important for Linux: After installation, either restart your terminal or run:
source $HOME/.cargo/env
Verify Installation:
uv --version
You should see something like uv 0.5.x or higher.
16.2 Step 2: Run the Road Profile Viewer
Navigate to your project folder and start the application:
# Make sure you're in the project directory
cd src/road-profile-viewer

# Run the main application
uv run main.py
Hint: The run command needs the path to your python files as an input. Thus main.py here is used as ./main.py.
That’s it! uv will automatically:
- ✅ Detect the required Python version
- ✅ Install all dependencies
- ✅ Create an isolated environment
- ✅ Start your application
16.3 Step 3: View Your Application
After a few seconds, you’ll see output in your terminal. The application will start a web server.
Open your browser and navigate to:
http://127.0.0.1:8050
🎊 You should see the Road Profile Viewer dashboard!
If everything worked correctly, you should see the interactive Road Profile Viewer dashboard in your browser:
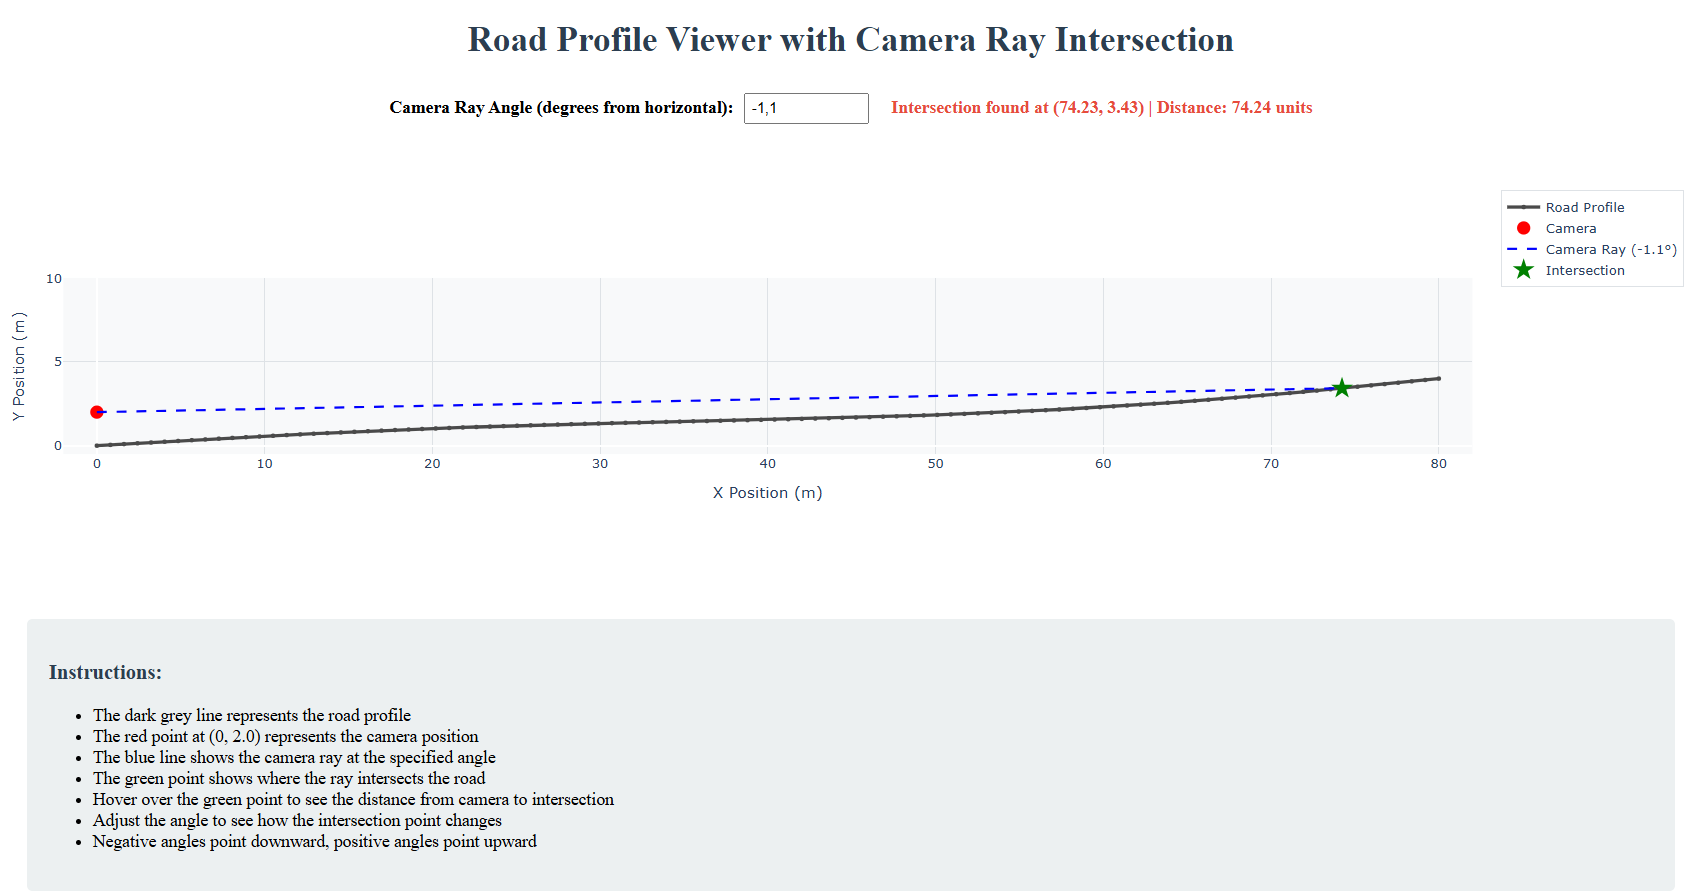 Figure 1: The Road Profile Viewer - Our first Python application running locally
Try interacting with the visualization - you’re now running a real Python web application!
16.4 What Just Happened?
With a single command (uv run main.py), you:
- Installed the correct Python version automatically
- Set up all project dependencies (Dash, Plotly, Pandas, etc.)
- Created an isolated environment (no conflicts with other projects)
- Started a web server with interactive visualizations
This is the modern Python workflow - no manual virtual environment creation, no dependency installation headaches, no “it works on my machine” problems.
16.5 Stopping the Application
To stop the server:
- Press Ctrl+C in your terminal
17. Understanding What Just Happened: Python Environments Demystified
You just ran uv run main.py and magically everything worked. But what actually happened behind the scenes? Understanding this is crucial for professional Python development.
17.1 The Magic Command: uv run main.py
When you executed uv run main.py, uv performed several sophisticated operations automatically:
- ✅ Read
pyproject.tomlto understand project requirements - ✅ Created an isolated virtual environment
- ✅ Installed all dependencies (Dash, Plotly, Pandas, etc.)
- ✅ Executed your Python script in that isolated environment
Let’s unpack each of these steps to understand what’s really happening.
17.2 What is a Python Virtual Environment?
17.2.1 The Problem: Dependency Chaos
Imagine you’re working on three different Python projects:
- Project A: Requires
pandas 1.5.0(older version) - Project B: Requires
pandas 2.1.0(newer version) - Your System: Can only have one global
pandasinstalled at a time
Without virtual environments, you face the “dependency hell”:
# Install pandas for Project A
pip install pandas==1.5.0

# Now switch to Project B
pip install pandas==2.1.0  # ⚠️ Overwrites 1.5.0!

# Go back to Project A
python projectA.py  # ❌ CRASHES! Wrong pandas version
17.2.2 The Solution: Isolated Environments
A virtual environment is like a separate Python installation for each project. It creates an isolated space where your project’s dependencies live independently from:
- Your system Python installation
- Other projects’ dependencies
- Global packages
Think of it like apartments in a building:
- Each apartment (virtual environment) has its own furniture (packages)
- Residents (projects) don’t interfere with each other
- The building (your computer) can host many independent apartments
- Each apartment can have different versions of the same furniture
17.2.3 What’s Actually Inside a Virtual Environment?
A virtual environment is just a directory structure containing:
.venv/                          # Virtual environment folder
├── bin/ (or Scripts/ on Windows)
│   ├── python                  # Python executable (copy or symlink)
│   ├── pip                     # Package installer for this env
│   └── activate                # Script to "enter" this environment
├── lib/
│   └── python3.12/
│       └── site-packages/      # WHERE YOUR PACKAGES LIVE
│           ├── pandas/         # Installed here, not globally!
│           ├── dash/
│           ├── plotly/
│           └── ...
└── pyvenv.cfg                  # Configuration file
Key insight: When you install packages in a virtual environment, they go into that environment’s site-packages/ folder, not your system’s global Python.
17.2.4 How Python Finds Packages
When you run Python, it searches for packages in this order:
- Current directory (where you run the script)
- Virtual environment’s
site-packages/(if active) - System Python’s
site-packages/(global installation) - Standard library (built-in modules)
Virtual environments work by putting their site-packages/ first in the search path, so their packages are found before global ones.
17.3 The Old Way: Manual Virtual Environments
Before uv, this is what you had to do every single time:
# Step 1: Create virtual environment (slow!)
python -m venv .venv            # Creates .venv/ folder

# Step 2: Activate it (OS-specific commands!)
# Windows:
.venv\Scripts\activate
# Mac/Linux:
source .venv/bin/activate

# Step 3: Upgrade pip (because it's always outdated)
pip install --upgrade pip

# Step 4: Install dependencies (one by one or from requirements.txt)
pip install dash plotly pandas numpy

# Step 5: Finally run your code
python main.py

# Step 6: Remember to deactivate when done
deactivate
Problems with this workflow:
- ❌ Slow: Creating venv takes 5-30 seconds
- ❌ Manual: You must remember all these steps
- ❌ Error-prone: Forget activation? Wrong environment!
- ❌ OS-specific: Different commands for Windows/Mac/Linux
- ❌ Not reproducible: No guarantee others have same versions
- ❌ Dependency conflicts:
pipcan install incompatible packages
17.4 The New Way: uv Does It All
With uv, all those steps collapse into one command:
uv run main.py # That's it. Seriously.
What uv does automatically:
# Behind the scenes (you don't see this):
[1] Read pyproject.toml
    ↓
[2] Check if .venv/ exists
    ├─ No? Create it (in milliseconds!)
    └─ Yes? Verify it's correct
    ↓
[3] Lock dependencies (resolve versions)
    ↓
[4] Install only what's missing (cached!)
    ↓
[5] Run your script in the virtual environment
Why this is revolutionary:
✅ Fast: Virtual environment creation in <100ms (not 5-30 seconds)
✅ Automatic: No activation, no manual steps
✅ Reproducible: Exact same versions for everyone
✅ Smart: Only installs what’s missing
✅ Cached: Reuses packages across projects
✅ Safe: Checks dependency compatibility before installing
17.5 Understanding pyproject.toml: Your Project’s Blueprint
The pyproject.toml file is the single source of truth for your Python project. Let’s open it and see what it contains:
# Open your project's pyproject.toml
code pyproject.toml
17.5.1 Anatomy of pyproject.toml
Here’s what you’ll see (with explanations):
[build-system]
# How to build/package your project
requires = ["hatchling"]
build-backend = "hatchling.build"

[project]
# Project metadata
name = "road-profile-viewer"
version = "0.1.0"
description = "Python tool for visualizing road elevation profiles"
authors = [{name = "YOUR_USERNAME", email = "your.email@example.com"}]
readme = "README.md"
requires-python = ">=3.10"  # Minimum Python version

# Dependencies: What packages this project needs
dependencies = [
    "dash>=2.14.0",          # Web framework
    "plotly>=5.18.0",        # Interactive visualizations
    "pandas>=2.1.0",         # Data manipulation
    "numpy>=1.24.0",         # Numerical operations
]

[project.optional-dependencies]
# Optional dependencies (e.g., for development)
dev = [
    "pytest>=7.4.0",         # Testing framework
    "ruff>=0.1.0",           # Linter
]

[tool.uv]
# uv-specific settings
dev-dependencies = [
    "pytest>=7.4.0",
]
17.5.2 Why pyproject.toml is Better Than Old Approaches
Old approach: requirements.txt
# requirements.txt - just a list
dash==2.14.0
plotly==5.18.0
pandas==2.1.0
numpy==1.24.0
Problems:
- ❌ No metadata (name, version, author)
- ❌ No Python version requirements
- ❌ No distinction between production and dev dependencies
- ❌ No build instructions
- ❌ Just a flat list of packages
Modern approach: pyproject.toml
- ✅ Everything in one file: Metadata + dependencies + build config
- ✅ Flexible version constraints:
>=2.14.0(any version 2.14+) - ✅ Separate dev dependencies: Testing tools don’t go to production
- ✅ Standardized format: Works with all modern Python tools
- ✅ Machine-readable: Tools can parse and validate it
17.5.3 Version Specifiers Explained
dependencies = [
    "dash>=2.14.0",      # Any version 2.14.0 or higher
    "plotly~=5.18.0",    # 5.18.x only (patch updates OK)
    "pandas>=2.1,<3.0",  # 2.1+ but not 3.x (major version locked)
    "numpy==1.24.0",     # Exact version (usually too strict!)
]
Best practice: Use >= for most dependencies, let uv resolve compatible versions.
17.6 Why uv is a Game-Changer: The Technical Evolution
Let’s compare the tools to understand why uv represents a major leap forward:
17.6.1 The Evolution of Python Package Management
1️⃣ Ancient Times: pip + venv (2013-2023)
python -m venv .venv         # Create environment (slow)
source .venv/bin/activate    # Activate (manual)
pip install -r requirements.txt  # Install (slow, no conflict checking)
Problems:
- Slow virtual environment creation (5-30 seconds)
- No dependency resolver (can install conflicting packages!)
- No caching across projects
- No lock files (reproducibility issues)
- Separate tools for everything (pip, venv, build, publish)
2️⃣ Middle Ages: Poetry / Pipenv (2018-2024)
poetry install # Better, but still slow
Improvements:
- ✅ Dependency resolver
- ✅ Lock files for reproducibility
- ✅ Integrated tooling
Remaining problems:
- Still slow (Python-based tools)
- Complex configuration
- Not universally adopted
3️⃣ Modern Era: uv (2024-2025)
uv run main.py # Everything, instantly
Revolutionary improvements:
🚀 Speed: Written in Rust
- Virtual environment creation: 10-100x faster than
venv - Package installation: 10-100x faster than
pip - Dependency resolution: blazingly fast compared to pip
Benchmarks (creating venv + installing 10 packages):
- Traditional (
venv+pip): ~30 seconds uv: ~1 second ⚡
🎯 Unified Tool
- Replace:
pip,venv,pipenv,poetry,build,twine - One tool:
uvdoes it all
🔒 Reproducibility
- Automatic lock files (
uv.lock) - Exact same dependencies for everyone
- Works across platforms (Windows/Mac/Linux)
🧠 Smart Caching
- Global package cache (not per-project)
- Install a package once, reuse everywhere
- Saves disk space and time
✅ Safety
- Proper dependency resolver (no conflicts)
- Validates package compatibility
- Warns about security issues
17.6.2 What Makes uv So Fast?
Traditional Python tools (pip, poetry):
- Written in Python (interpreted language)
- Create new Python processes for everything
- No parallel operations
- Inefficient file I/O
uv (written in Rust):
- Compiled to native machine code
- Parallel package downloads and installations
- Optimized file operations
- Zero-copy optimizations where possible
Real-world impact:
# Traditional workflow: Install Django + deps
time pip install django
# ⏱️ ~15 seconds

# Modern workflow with uv
time uv pip install django
# ⏱️ ~1 second ⚡
17.7 Putting It All Together: Your Development Workflow
Now you understand the complete picture:
You type: uv run main.py
         ↓
    [uv reads pyproject.toml]
         ↓
    "This project needs:
     - Python 3.10+
     - dash>=2.14.0
     - plotly>=5.18.0
     - pandas>=2.1.0
     - numpy>=1.24.0"
         ↓
    [uv checks .venv/]
         ↓
    No .venv? → Create one (100ms)
    .venv exists? → Verify it's correct
         ↓
    [uv resolves dependencies]
         ↓
    "Checking compatibility...
     dash 2.14.0 needs plotly 5.x ✓
     pandas 2.1.0 needs numpy 1.24+ ✓
     All compatible!"
         ↓
    [uv installs packages]
         ↓
    Check cache → Already have plotly 5.18.0? Reuse it!
    Missing pandas? → Download + install (fast!)
         ↓
    [uv runs your script]
         ↓
    python .venv/bin/python main.py
         ↓
    🎉 Your app runs!
The beauty: All this complexity is hidden. You just type uv run main.py and it works.
17.8 Key Takeaways
1. Virtual Environments:
- Isolated spaces for project dependencies
- Prevent conflicts between projects
- Located in
.venv/folder - Contain their own
site-packages/directory
2. pyproject.toml:
- Single source of truth for your project
- Specifies dependencies with version constraints
- Contains metadata (name, version, authors)
- Modern replacement for
requirements.txt+setup.py
3. Why uv Matters:
- Speed: 10-100x faster than traditional tools
- Simplicity: One command replaces many
- Reliability: Proper dependency resolution
- Modern: Built for 2025’s development workflows
4. Professional Workflow:
# That's it. One command.
uv run main.py

# Compare to the old way:
python -m venv .venv
source .venv/bin/activate  # or .\venv\Scripts\activate on Windows
pip install --upgrade pip
pip install -r requirements.txt
python main.py
deactivate
The future of Python development is here, and it’s fast.
18. Beyond the Basics: More uv Workflows
Now that you understand what’s happening behind the scenes, let’s explore additional ways to work with uv. There’s more than one way to run your Python applications!
18.1 Three Ways to Run Your Application
18.1.1 Method 1: uv run (What You Just Learned) ⚡ Fastest for Development
uv run main.py
Pros:
- ✅ Simplest command
- ✅ Automatic everything (venv + install + run)
- ✅ Perfect for quick iterations
When to use: Day-to-day development, testing, quick runs
18.1.2 Method 2: Manual Virtual Environment 🔧 More Control
Sometimes you want more control over the environment. Here’s how to create and manage it manually with uv:
Step 1: Create the virtual environment
# uv creates venvs MUCH faster than python -m venv
uv venv
This creates .venv/ folder in your project (just like python -m venv .venv, but 10-100x faster!)
Step 2: Activate the environment
Windows (PowerShell):
.venv\Scripts\Activate.ps1
Ubuntu/Linux/Mac:
source .venv/bin/activate
You’ll see (.venv) appear in your terminal prompt, indicating the environment is active.
Step 3: Sync your project dependencies
# Modern uv way: sync environment with pyproject.toml
uv sync
This installs all dependencies listed in your pyproject.toml into the active virtual environment.
Step 4: Run your application
# Now you can just run python directly
python main.py
Step 5: Deactivate when done
deactivate
Pros:
- ✅ Full control over environment
- ✅ Can inspect installed packages (
uv pip list) - ✅ Useful for debugging environment issues
- ✅ Similar to traditional workflow (familiar to experienced developers)
Cons:
- ❌ More manual steps
- ❌ Must remember to activate
When to use:
- Debugging environment issues
- When you need to install additional packages interactively
- Working with IDEs that need explicit venv paths
18.1.3 Method 3: Named Scripts 🎯 Most Professional
This is where Python projects really shine! You can define named commands in pyproject.toml that run your application. Let’s set this up!
18.2 Hands-On Task: Add a Named Script
Step 1: Open pyproject.toml
code pyproject.toml
Step 2: Add a scripts section
Find the [project] section and add this at the end (before [tool.uv] if it exists):
[project.scripts]
# Command name = "module:function"
road-viewer = "main:main"
What this means:
road-viewer: The command name you’ll type in terminalmain:main: Run themain()function frommain.pymodule
Step 3: Update your main.py to have a main() function
Open main.py and wrap the main code in a function:
# main.py
import dash
from dash import dcc, html
import plotly.graph_objects as go
# ... other imports ...

def main():
    """Main entry point for the Road Profile Viewer application."""
    # Your existing code that creates and runs the app
    app = dash.Dash(__name__)

    # ... rest of your app code ...

    app.run_server(debug=True, host='127.0.0.1', port=8050)

# This allows running as script OR as installed command
if __name__ == "__main__":
    main()
Step 4: Sync your project to register the script
# Sync installs dependencies and registers scripts from pyproject.toml
uv sync
This will:
- Install all project dependencies
- Register the
road-viewercommand so you can use it - Create the virtual environment if it doesn’t exist
Step 5: Run using the named command!
# Now you can run your app with a clean, professional command
road-viewer
Or even better, use uv run with the script name:
uv run road-viewer
🎉 You’ve just created a professional CLI command!
18.3 Why Named Scripts Are Professional
Instead of:
python main.py                    # ❌ Not very professional
python src/road_profile/main.py   # ❌ Hard to remember paths
cd /path/to/project && python main.py  # ❌ Requires navigation
You get:
road-viewer # ✅ Clean, memorable command
Real-world examples:
pytestruns testsblackformats coderufflints codeuvicornruns web servers
These are all Python packages with named scripts in pyproject.toml!
18.4 Comparing the Three Methods
| Method | Command | Setup Required | Speed | Use Case |
|---|---|---|---|---|
| uv run | uv run main.py |
None | ⚡ Instant | Quick development |
| Manual venv | python main.py |
Create + activate | 🔧 Controlled | Debugging, IDE setup |
| Named script | road-viewer |
Add to toml + install | 🎯 Professional | Production, distribution |
18.5 Advanced: Multiple Scripts
You can define multiple commands in one project:
[project.scripts]
# Main application
road-viewer = "main:main"

# Data processing utilities
process-data = "scripts.process:main"
export-report = "scripts.export:generate_report"

# Development tools
dev-server = "main:run_dev_mode"
Then use them like:
uv run road-viewer          # Start the viewer
uv run process-data input.csv    # Process data
uv run export-report --format pdf  # Export report
18.6 What You Should Do Next
For this course, we recommend:
- During development: Use
uv run main.py- it’s fastest and simplest - For this task: Add the named script
road-viewerto yourpyproject.toml - Commit your changes:
git add pyproject.toml main.py
git commit -m "Add professional CLI command for road viewer"
git push
Benefits of adding the script now:
- ✅ Practice professional project structure
- ✅ Your project looks more polished on GitHub
- ✅ Anyone cloning your repo can run
uv run road-viewer - ✅ Sets you up for future enhancements (command-line arguments, etc.)
18.7 Quick Reference: uv Commands You Should Know
# Environment management
uv venv                    # Create virtual environment (fast!)
uv venv --python 3.12      # Create with specific Python version

# Package management (modern uv way)
uv add package             # Add package to pyproject.toml and install
uv add package --dev       # Add as development dependency
uv remove package          # Remove package from project
uv sync                    # Sync environment with pyproject.toml
uv lock                    # Create/update uv.lock file

# Installing tools globally (like pytest, black, ruff)
uv tool install ruff       # Install a tool globally
uv tool install pytest     # Available everywhere, not just this project
uv tool list               # List globally installed tools
uv tool uninstall ruff     # Remove a global tool

# Running code
uv run script.py           # Run a Python script
uv run command             # Run a named script from pyproject.toml
uv run --with package script.py  # Run with temporary dependency
uv run python              # Start Python REPL with project dependencies

# Project initialization
uv init                    # Create new Python project with pyproject.toml
uv init --app              # Create application project
uv init --lib              # Create library project

# Python version management
uv python install 3.12     # Install Python 3.12
uv python list             # List available Python versions
uv python pin 3.12         # Pin project to Python 3.12
💡 Key Difference:
- ❌ Old way (compatibility):
uv pip install package- mimics pip - ✅ Modern way (native):
uv add package- updates pyproject.toml automatically
Why uv add is better:
- Automatically updates
pyproject.toml(single source of truth) - Creates/updates
uv.lockfor reproducibility - Resolves dependencies properly
- No manual editing of configuration files
19. Lecture Quiz: Test Your Understanding
Now that you’ve completed Chapter 01 (Modern Python Development), it’s time to assess your understanding of modern Python development practices. This quiz serves multiple important purposes:
19.1 Why Take This Quiz?
For Your Learning:
- Self-Assessment: Identify areas where you have strong understanding and topics that need review
- Exam Preparation: The quiz format and difficulty mirror what you can expect in the final exam
- Immediate Feedback: Get instant feedback on your answers to reinforce correct understanding
- Active Recall: Testing yourself is one of the most effective learning techniques
For Course Improvement:
- Anonymous Feedback: Your responses help me understand which concepts need more explanation
- Content Adjustment: If many students struggle with a topic, we’ll spend more time on it in class
- Pacing Indicator: Shows me if we’re moving too fast or too slow
19.2 Quiz Details
- Time Required: Approximately 10-15 minutes
- Questions: 20 multiple-choice questions covering all major topics from this lecture
- Topics Covered:
- Why Python dominates modern software development
- Virtual environments and dependency management
- Understanding pyproject.toml and modern Python packaging
- The uv revolution: what makes it 10-100x faster
- Three workflows: uv run, manual venv, and named scripts
- Script Python vs. Production Python
- Modern vs. legacy Python commands
- Professional development practices
- Format: Multiple choice with instant feedback
- Privacy: Completely anonymous - no personal information collected
- Attempts: You can take it multiple times to improve your understanding
- Grading: Automatically scored with explanations for each answer
19.3 Important Notes
- This quiz is not graded and does not affect your final course grade
- Results are used only for improving teaching and helping you prepare for the actual exam
- Questions similar to these will appear in the final exam
- Focus on understanding why things work, not just memorizing commands
- Each lecture will have a similar quiz throughout the semester
📋 Ready to test your knowledge of modern Python development?
Take the Chapter 01 (Modern Python Development) Quiz
After completing the quiz, you’ll have a clear picture of your mastery of this lecture’s content. Remember: the goal isn’t to memorize numbers or specific commands, but to understand the why behind modern Python development practices. Struggling with some questions is normal and expected—that’s how you learn!
20. References
[1] GitHub Search - Python Repositories. https://github.com/search?q=language%3Apython&type=repositories
[2] GitHub Octoverse 2024 - The State of Open Source. https://octoverse.github.com/
[3] RedMonk Programming Language Rankings (2024). https://redmonk.com/sogrady/category/programming-languages/
[4] Stack Overflow Developer Survey 2024. https://survey.stackoverflow.co/2024/
[5] TIOBE Index (October 2025). https://www.tiobe.com/tiobe-index/
[6] IEEE Spectrum Top Programming Languages 2024. https://spectrum.ieee.org/top-programming-languages-2024
[7] Papers With Code - Python Usage in ML Research. https://paperswithcode.com/
[8] arXiv.org - AI/ML Code Repository Analysis. https://arxiv.org/
[9] Google Scholar - Programming Language Citations (2020-2025). https://scholar.google.com/
[10] NumPy, SciPy, Pandas Official Documentation and Usage Statistics. https://numpy.org/, https://scipy.org/, https://pandas.pydata.org/
[11] Jupyter Project - Notebook Statistics. https://jupyter.org/, GitHub Search: https://github.com/search?q=extension%3Aipynb
[12] Nature and Science Journal Computational Methods Surveys (2024). Analysis of programming language mentions in computational biology and scientific computing papers.
[13] PyPI Statistics - Python Package Index. https://pypi.org/, https://pypistats.org/
[14] Stack Overflow Python Tag Statistics. https://stackoverflow.com/questions/tagged/python
[15] Stack Overflow Developer Survey 2024 - Salary Insights & Indeed Salary Survey 2025. https://survey.stackoverflow.co/2024/#salary, https://www.indeed.com/career/python-developer/salaries
[16] LinkedIn Jobs - Python Skills Demand (October 2025). https://www.linkedin.com/jobs/search/?keywords=python
[17] Public company engineering blogs and official technology stack announcements:
- Google: https://opensource.google/
- Netflix: https://netflixtechblog.com/
- NASA: https://code.nasa.gov/
- See also: StackShare Company Tech Stacks https://stackshare.io/
[18] PyTorch and TensorFlow Official Documentation and GitHub Statistics:
- PyTorch: https://pytorch.org/
- TensorFlow: https://www.tensorflow.org/
[19] Hugging Face Model Hub Statistics. https://huggingface.co/
[20] LangChain and LlamaIndex Documentation:
- LangChain: https://www.langchain.com/
- LlamaIndex: https://www.llamaindex.ai/
[21] OpenAI Platform and Anthropic API Documentation:
- OpenAI: https://platform.openai.com/docs/
- Anthropic: https://docs.anthropic.com/
Note: Statistics and market data reflect information available as of October 2025. Job market figures and salary data vary by region, experience level, and specific role requirements. Links to surveys and indices are updated annually or quarterly.