01 Modern Development Tools: Repositories, Git, GitHub, and AI-Powered IDEs
October 2025 (7697 Words, 43 Minutes)
1. Understanding Repositories: The Foundation of Modern Development
1.1 What is a Repository?
A repository (often abbreviated as “repo”) is a central storage location where your project’s files, code, documentation, and complete history of changes are maintained. Think of it as a sophisticated filing cabinet that not only stores your current documents but also remembers every version of every document you’ve ever created, along with notes about who made changes and why.
In traditional software development, developers might work with folders on their local machines, perhaps making backup copies with names like project_v1.zip, project_v2_final.zip, project_v2_final_REALLY_FINAL.zip. This approach quickly becomes chaotic and unsustainable, especially when working in teams. Repositories solve this problem by providing a structured, systematic approach to managing code and its evolution over time.
A repository typically contains:
- Source code files: The actual programs and scripts you write
- Documentation: README files, wikis, and technical documentation
- Configuration files: Settings for your development environment and deployment
- Test files: Automated tests to ensure code quality
- History metadata: Complete records of who changed what, when, and why
In essence, a repository is a living ecosystem around your code that enables professional software development at scale.
1.2 Local vs. Remote Repositories
Repositories exist in two primary forms:
Local repositories reside on your personal computer. You can work with them offline, making changes and tracking history without internet connectivity. This is where you do your day-to-day development work.
Remote repositories are hosted on servers and accessible via the internet. They serve as the central hub where team members synchronize their work. Remote repositories enable collaboration, provide backup redundancy, and serve as the authoritative source of truth for your project.
The relationship between local and remote repositories is fundamental to modern development workflows. You typically work on a local copy of the repository, make your changes, and then synchronize (push) those changes to the remote repository. Similarly, you can retrieve (pull) changes made by others from the remote repository to your local machine.
1.3 Why GitHub? The Modern Developer’s Portfolio
1.4 GitHub as the Industry Standard
GitHub is the world’s leading platform for hosting remote Git repositories, and it has fundamentally transformed how software is developed, shared, and evaluated. Founded in 2008 and acquired by Microsoft in 2018, GitHub hosts over 100 million repositories and serves as the de facto standard for open-source collaboration and professional software development.
When we talk about GitHub in this course, we’re not just discussing a technical tool—we’re discussing your professional identity in the software engineering world. In 2025, a well-maintained GitHub profile carries more weight in the tech industry than a traditional CV or resume.
1.5 The Repository as Your Digital Portfolio
Here’s a crucial insight for your career: A well-maintained GitHub profile is more valuable than a polished CV.
Why? Because your GitHub repositories demonstrate:
- Quality of your code: Is it clean, well-documented, and following best practices?
- Consistency of contribution: Do you code regularly, or was everything done the night before deadlines?
- Collaboration skills: How do you interact with other developers? Can you give and receive constructive feedback?
- Problem-solving ability: What kinds of problems do you tackle? How do you approach them?
- Learning trajectory: How have your skills evolved over time?
- Open-source engagement: Do you contribute to community projects?
This transparency works both ways. As a student, you benefit from seeing how experienced developers structure their projects, write code, and solve problems. The entire history of many professional software projects is available for study.
Modern employers increasingly look at GitHub profiles before resumes because code doesn’t lie.
Want inspiration? Check out this curated collection of impressive GitHub profiles from the developer community to see what makes a standout portfolio.
1.6 Academic Advantages of GitHub
For academic work, GitHub provides several compelling features:
Version History for Academic Integrity: Every change is timestamped and attributed. This creates a transparent record of your work’s evolution, which can be invaluable for proving originality in academic contexts.
Collaboration Framework: Group projects become manageable. GitHub’s pull request system allows team members to propose changes, discuss implementations, and review each other’s code before integration.
Documentation Hosting: GitHub Pages allows you to turn your repositories into websites, perfect for project documentation, portfolios, or even hosting your academic papers.
Issue Tracking: Built-in project management tools help you organize tasks, track bugs, and manage project milestones.
GitHub Education Benefits: Students receive free access to premium features through GitHub Education, including private repositories, advanced security features, and access to developer tools that would normally require paid subscriptions.
2. GitHub vs. GitLab: Why GitHub Leads the Industry
While both GitHub and GitLab are excellent platforms, GitHub has distinct advantages for both academia and industry:
2.1 GitHub’s Advantages for Students and Academia
1. Educational Benefits
- GitHub Student Pack - Free access to premium developer tools worth thousands of dollars
- GitHub Classroom - Seamless integration with university coursework
- Massive learning community - Millions of open-source projects to study
- Industry standard - What you’ll encounter in most professional environments
2. Network Effects
- Largest developer community - Over 100 million developers worldwide
- Open source hub - Most major projects are hosted on GitHub
- Visibility - Recruiters and employers primarily search GitHub
- Documentation ecosystem - GitHub Pages for project websites
3. Industry Integration
- Microsoft ecosystem - Deep integration with VS Code, Azure, and Microsoft tools
- Third-party tools - Broader ecosystem of integrations and applications
- Enterprise adoption - Most companies use GitHub, making your skills immediately transferable
2.2 Historical Context and Current State
GitLab was an early pioneer in integrated DevOps, offering CI/CD pipelines years before GitHub Actions existed. Additionally, GitLab itself is open source (both the Community Edition and many parts of the Enterprise Edition), which appeals to organizations that value transparency and the ability to contribute to the platform itself.
Where GitLab maintains advantages:
- Open source platform - GitLab itself is open source, not just a host for open source projects
- Earlier DevOps integration - Longer history and maturity in CI/CD (though GitHub has caught up)
- All-in-one philosophy - More features built-in rather than through marketplace extensions
Where GitHub has caught up or excelled:
- GitHub Actions - Now a powerful, flexible CI/CD solution that rivals GitLab CI
- GitHub Enterprise - Comprehensive enterprise features with excellent support
- Cloud + Self-hosted options - GitHub Enterprise Server offers self-hosting capabilities
- Larger ecosystem - More third-party integrations and community-built actions
The reality in 2025: Both platforms are excellent and feature-complete for professional development. GitHub’s massive community and industry adoption make it the better choice for learning and career preparation, but GitLab remains a strong alternative, particularly for organizations that prioritize open source platforms or have invested heavily in GitLab’s DevOps ecosystem.
GitLab is GitHub’s primary competitor and offers similar functionality. Let’s examine why GitHub remains the superior choice for most use cases:
2.3 Platform Comparison: GitHub vs. GitLab
Market Share
- GitHub: Dominant (~90% of open source)
- GitLab: Growing but smaller
- Winner: GitHub - Industry standard, larger community
User Interface
- GitHub: Polished, intuitive
- GitLab: Feature-rich but complex
- Winner: GitHub - Better for beginners
Community
- GitHub: Massive, highly active
- GitLab: Growing but smaller
- Winner: GitHub - More learning resources, easier to find help
Integration Ecosystem
- GitHub: Extensive third-party integrations
- GitLab: Good but more limited
- Winner: GitHub - Better tool support
CI/CD
- GitHub: GitHub Actions (intuitive)
- GitLab: GitLab CI/CD (powerful)
- Winner: Tie - Both excellent, different approaches
Job Market Relevance
- GitHub: Near-universal requirement
- GitLab: Less commonly required
- Winner: GitHub - Better career preparation
Education Programs
- GitHub: GitHub Education Pack
- GitLab: GitLab for Education
- Winner: GitHub - More comprehensive student benefits
Documentation
- GitHub: Extensive, beginner-friendly
- GitLab: Comprehensive but dense
- Winner: GitHub - Better learning curve
3. Creating Your GitHub Account and First Repository
3.1 Step 1: Setting Up Your GitHub Account
- Visit GitHub.com and click “Sign up”
-
Choose a professional username - This will be part of your professional identity.
Choose your username carefully. Consider these guidelines:
- Professional: Use your real name or a professional variant (e.g.,
john-smith,jsmith-dev) - Memorable: Keep it simple and easy to spell
- Consistent: Ideally, match other professional profiles (LinkedIn, etc.)
- Permanent: Changing usernames later disrupts your professional links
❌ Avoid:
c00ld3v420,xxxprogrammer,temporary_account
✅ Good:maria-schmidt,dev-alex-chen,sarah-k-developer - Professional: Use your real name or a professional variant (e.g.,
- Apply for GitHub Student Benefits
- Visit education.github.com
- Verify your student status with your university email
- Gain access to GitHub Pro features and the Student Developer Pack
3.2 Student Benefits You’ll Receive
The GitHub Student Developer Pack includes:
- GitHub Pro - Unlimited private repositories and advanced features
- GitHub Copilot - AI-powered coding assistant
- Heroku - Cloud hosting credits
- DigitalOcean - Server hosting credits
- JetBrains - Professional IDE licenses
3.3 Step 2: Creating Your First Repository
Let’s create your first repository called “MyFirstRepo”:
- Click the “+” icon in the top right corner
- Select “New repository”
- Configure your repository:
Repository name: MyFirstRepo Description: My first repository for learning Git and GitHub ✅ Public (for learning purposes) ✅ Add a README file ✅ Add .gitignore (choose a relevant template) ✅ Choose a license (MIT License is a good default) - Click “Create repository”
Congratulations! You’ve just created your first repository. Notice how GitHub automatically:
- Created a README.md file for documentation
- Added a .gitignore file to exclude unnecessary files
- Applied a license to clarify how others can use your code
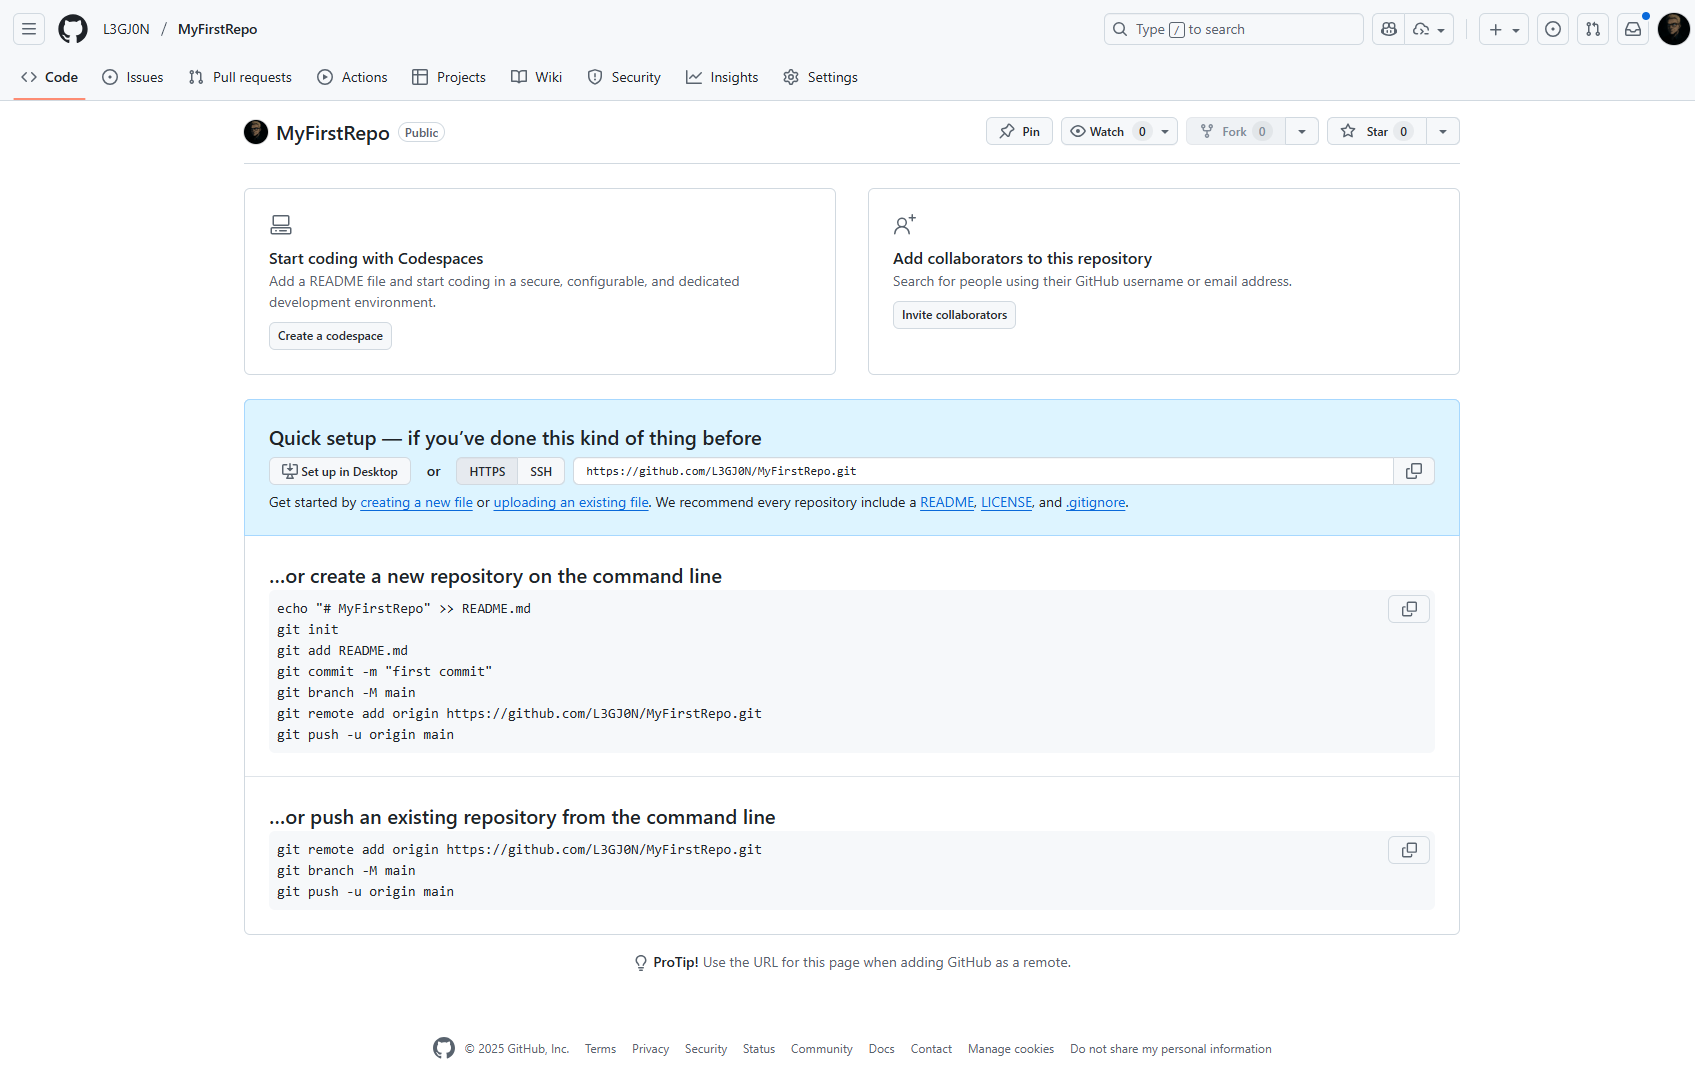 Figure 1: Your first GitHub repository successfully created
4. Version Control: Why It’s Mandatory for Professional Development
4.1 The Problem Version Control Solves
Imagine you’re writing a research paper. You might save versions like this:
paper.docx
paper_v2.docx
paper_v2_final.docx
paper_v2_final_reviewed.docx
paper_v2_final_reviewed_actually_final.docx
paper_v2_final_reviewed_actually_final_FOR_REAL.docx
This approach has serious problems:
- No clear history: Which version had that brilliant paragraph you deleted?
- Storage waste: Each copy duplicates 99% of unchanged content
- Collaboration nightmare: How do you merge changes from multiple authors?
- No accountability: Who made that change that broke everything?
- No comparison: How do you see exactly what changed between versions?
Now imagine this problem with a software project containing thousands of files, dozens of developers, and changes happening every hour. The chaos would be unbearable.
Version control systems solve these problems by maintaining a complete history of changes while allowing multiple people to work simultaneously without conflicts.
4.2 Why Version Control is Mandatory
In modern software engineering, version control is not optional—it’s as fundamental as the programming language itself. As we discussed in section 1.3, platforms like GitHub have made version control central to professional development. Here’s why:
4.2.1 Historical Record and Accountability
Every change is recorded with:
- What changed (exact lines of code)
- Who made the change (author identification)
- When it happened (timestamp)
- Why it was made (commit message explaining the reason)
This creates an audit trail invaluable for understanding project evolution, debugging issues, and maintaining code quality.
4.2.2 Parallel Development
Multiple developers can work on different features simultaneously without interfering with each other. Version control systems manage the complexity of merging these parallel streams of work.
4.2.3 Experimentation Safety
Want to try a radical new approach? Create a branch, experiment freely, and if it doesn’t work, simply discard it without affecting the main codebase. If it works brilliantly, merge it back in.
4.2.4 Rollback Capability
Deployed an update that breaks production? Roll back to the previous working version instantly. Found a bug that was introduced six months ago? You can identify exactly which change introduced it.
4.2.5 Code Review and Quality
Version control systems facilitate structured code review processes where changes are examined before integration, catching bugs and improving code quality.
4.2.6 Documentation Through History
The commit history serves as living documentation, explaining not just what the code does, but why decisions were made. This is invaluable for maintaining projects long-term.
4.3 Git: The Universal Standard
When we teach version control, we teach Git. This isn’t arbitrary—Git has become the universal standard for version control in software engineering. Let’s understand why Git is the right (and only) choice you need to learn:
Git dominates version control with over 95% market share in professional development. Here’s why learning Git is the right choice:
4.3.1 Universal Adoption
- Industry standard - Used by Google, Microsoft, Facebook, Netflix, and virtually every tech company
- Open source projects - Linux kernel, Python, React, and millions of other projects
- Academic institutions - Standard in computer science curricula worldwide
4.3.2 Technical Superiority
- Distributed architecture - Every developer has a complete copy of the project history
- Branching and merging - Sophisticated tools for parallel development
- Performance - Extremely fast operations even on large projects
- Data integrity - Cryptographic hashing ensures data cannot be corrupted
4.3.3 Transferable Skills
Learning Git means you can easily adapt to any version control system:
- Mercurial - Similar distributed model
- Subversion - Centralized systems become trivial to understand
- Perforce - Enterprise systems share similar concepts
Career Reality: You will likely use Git for your entire career. Other version control systems are becoming increasingly rare in professional environments.
4.4 Core Git Concepts
Understanding these concepts is crucial for working with Git effectively. These build directly on the repository fundamentals we covered earlier:
Repository (Repo): The complete project including all files and their entire history (as explained in section 1.1)
Commit: A snapshot of your project at a specific point in time, with a descriptive message
Branch: A parallel version of your code where you can experiment safely
Merge: Combining changes from different branches
Clone: Creating a local copy of a remote repository (review local vs. remote repositories in section 1.2)
Push: Uploading your local changes to a remote repository
Pull: Downloading changes from a remote repository to your local copy
Here’s the crucial insight: Once you understand Git, you understand version control.
The concepts you learn—commits, branches, merges, diffs, logs—are universal. If you ever encounter another version control system (unlikely but possible in legacy enterprise environments), you’ll find:
- The core concepts are identical (they have to be—they solve the same problems)
- Only the command syntax differs
- You’ll adapt in hours, not weeks
Learning Git isn’t learning a specific tool—it’s learning how professional software development works. The specific commands are just syntax; the mental model is what matters.
5. Installing Git
5.1 Windows Installation
- Download Git for Windows
- Visit git-scm.com
- Click “Download for Windows”
- Run the installer with these recommended settings:
✅ Use Git from Git Bash only (safest option)
✅ Use OpenSSL library
✅ Checkout Windows-style, commit Unix-style line endings
✅ Use Windows' default console window
✅ Enable file system caching
✅ Enable Git Credential Manager
- Verify Installation
git --version
# Should output: git version 2.x.x
5.2 Installation on Linux (Ubuntu)
Important Note: Many Linux distributions, including Ubuntu, come with Git pre-installed as part of their standard package set. This is because Git is a fundamental tool in the Linux ecosystem and is used by the operating system itself for various tasks. The philosophy of Linux distributions is to include essential development tools out-of-the-box, making it immediately ready for software development without additional setup.
Before installing, let’s check if Git is already available on your system:
git --version
If you see a version number (like git version 2.34.1), Git is already installed and you can skip to the “Verify Installation” section below. If you see “command not found” or a similar error, proceed with the installation steps.
- Update package manager and install Git
sudo apt update sudo apt install git-all - Verify Installation
git --version
# Should output: git version 2.x.x
5.3 Initial Git Configuration
Configure Git with your identity:
git config --global user.name "Your Full Name"
git config --global user.email "your.email@university.edu"
git config --global init.defaultBranch main
Important: Use your real name and the same email address you used for your GitHub account. Replace “Your Name” and “your.email@university.edu” with your actual information.
5.3.1 Optional: Configure Line Endings (Cross-Platform Teams)
If you’re working in teams with both Windows and Linux/Mac users:
git config --global core.autocrlf true    # On Windows
git config --global core.autocrlf input   # On Linux/Mac
This ensures consistent line endings across different operating systems.
6. Cloning Your First Repository
Now that Git is installed and configured, let’s connect your local machine to your GitHub repository. We’ll clone the MyFirstRepo repository you created earlier.
6.1 Understanding Cloning
Cloning creates a complete local copy of a remote repository, including:
- All files and folders
- Complete commit history
- All branches
- Repository configuration
After cloning, you have a fully functional local repository that you can work with offline and synchronize with the remote repository when ready.
6.1.1 Step 1: Get the Repository URL
- Navigate to your
MyFirstReporepository on GitHub (should be athttps://github.com/YOUR_USERNAME/MyFirstRepo) - Click the green “Code” button
- Ensure “HTTPS” is selected (should be underlined)
- Click the copy icon to copy the repository URL
The URL will look like: https://github.com/YOUR_USERNAME/MyFirstRepo.git
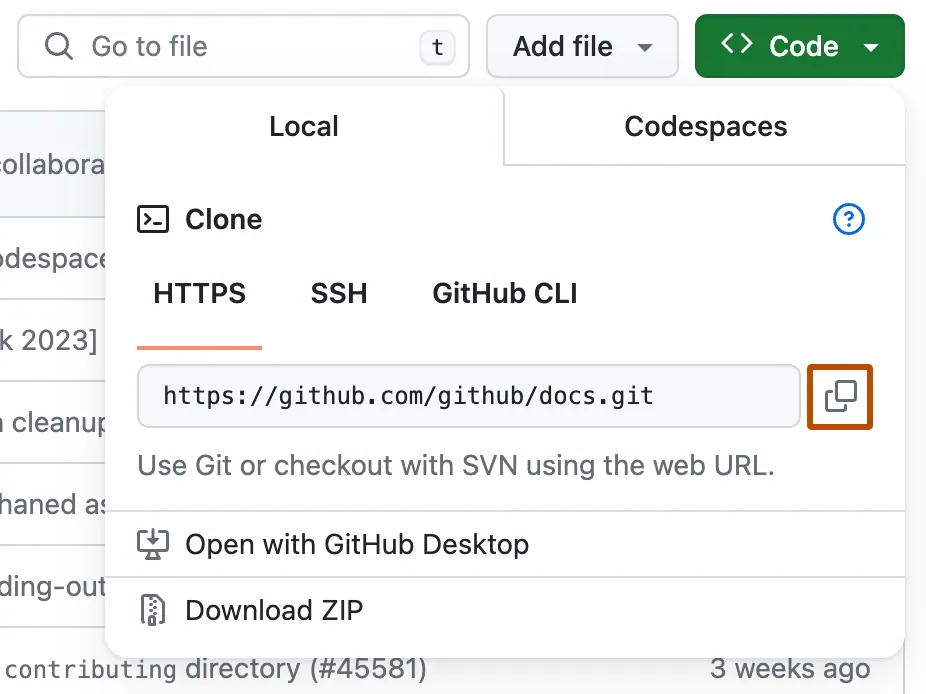 Figure 4: Copying the repository URL from GitHub
6.1.2 Step 2: Choose a Location
Decide where on your computer you want to store your repositories. A good practice is to create a dedicated folder for all your coding projects. For example:
Windows: C:\Users\YourName\Documents\Projects
Linux: ~/Projects or ~/Documents/Projects
Create this folder if it doesn’t exist.
6.1.3 Step 3: Open Terminal in Your Project Directory
Windows:
- Navigate to your Projects folder in File Explorer
- Hold Shift and right-click in the folder
- Select “Open PowerShell window here” or “Open command window here”
Linux:
- Open Terminal (Ctrl+Alt+T)
- Navigate to your Projects folder:
cd ~/Projects
6.1.4 Step 4: Clone the Repository
In your terminal, type git clone followed by the URL you copied:
git clone https://github.com/YOUR_USERNAME/MyFirstRepo.git
Replace YOUR_USERNAME with your actual GitHub username.
Press Enter. You should see output like:
Cloning into 'MyFirstRepo'...
remote: Enumerating objects: 5, done.
remote: Counting objects: 100% (5/5), done.
remote: Compressing objects: 100% (4/4), done.
remote: Total 5 (delta 0), reused 0 (delta 0), pack-reused 0
Receiving objects: 100% (5/5), done.
6.1.5 Step 5: Navigate into Your Repository
Change directory into your newly cloned repository:
cd MyFirstRepo
6.1.6 Step 6: Explore Your Repository
List the contents:
ls        # Linux
dir       # Windows
You should see the files from your GitHub repository:
README.md.gitignoreLICENSE
View the README content:
cat README.md     # Linux
type README.md    # Windows
7. Integrated Development Environments (IDEs): Your Programming Command Center
As you progress in software engineering, you’ll spend thousands of hours writing code. The environment in which you write that code dramatically impacts your productivity, code quality, and even enjoyment of programming. This is where Integrated Development Environments (IDEs) become crucial.
7.1 Why IDEs Are Essential
An IDE is a software application that combines all the tools you need for software development in one interface:
- Text editor with syntax highlighting and intelligent code completion
- Debugger for finding and fixing bugs
- Compiler/interpreter integration for running your code
- Version control integration (Git)
- Terminal access
- Extension system for adding capabilities
- Project management tools
- Code analysis and linting tools
The difference between a simple text editor (like Notepad) and a modern IDE is like the difference between a hammer and a complete workshop. While you can write code in Notepad, you’ll be far more productive with proper tools.
7.2 Why Visual Studio Code for This Course
We’ve chosen Visual Studio Code (VS Code) as our primary IDE for several compelling reasons:
7.2.1 Open Source and Free
- Completely free - No licensing costs or restrictions
- Open source - Transparent development and community-driven improvements
- Cross-platform - Works identically on Windows, macOS, and Linux
7.2.2 Language Support
- Excellent Python support - IntelliSense, debugging, testing integration
- Strong C++ capabilities - With appropriate extensions
- Universal language support - Works with virtually any programming language
7.2.3 AI Integration
- GitHub Copilot native support - Seamless AI-powered coding assistance
- Built-in terminal - No need to switch between applications
- Git integration - Visual interface for version control operations
7.2.4 Extensibility
- Massive extension marketplace - Over 30,000 extensions
- Customizable interface - Adapt to your workflow preferences
- Active development - Monthly updates with new features
7.2.5 Industry Adoption
- Most popular IDE - According to Stack Overflow Developer Survey
- Enterprise ready - Used by major corporations worldwide
- Community support - Extensive documentation and tutorials
7.3 VS Code vs. Alternatives
While we’ll primarily use VS Code, it’s worth understanding the landscape:
Cursor: An AI-first code editor we’ll explore later
- Built on VS Code foundation
- Enhanced AI capabilities
- Advanced context awareness
PyCharm: Excellent for Python-specific development
- More heavyweight than VS Code
- Powerful debugging tools
- Commercial license required for full features
IntelliJ IDEA: Outstanding for Java and enterprise development
- Exceptional refactoring tools
- Complex project management
- Resource intensive
Sublime Text: Lightweight and fast
- Minimal interface
- Limited built-in features
- Excellent for quick edits
For learning and general development, VS Code provides the optimal balance of features, performance, and ease of use.
7.4 Cursor: The AI-First IDE
Cursor deserves special attention as it represents the next evolution of AI-integrated development environments.
7.4.1 What is Cursor?
Cursor is a fork of VS Code specifically designed around AI assistance. It integrates AI more deeply than Copilot, offering:
- AI Chat in Context: Like Copilot Chat but more tightly integrated
- AI-Powered Refactoring: Request code changes in natural language
- Codebase Understanding: AI that understands your entire project
- Multi-file Edits: AI can suggest changes across multiple files simultaneously
7.4.2 Why We’ll Explore Cursor Later
Cursor represents where development environments are heading. We’ll introduce it later in the course after you’ve mastered the fundamentals with VS Code and Copilot. Understanding the baseline (VS Code) makes it easier to appreciate Cursor’s innovations.
7.4.3 Cursor vs. VS Code + Copilot
| Feature | VS Code + Copilot | Cursor |
|---|---|---|
| Baseline Editor | Industry standard VS Code | VS Code fork (similar UX) |
| AI Integration | Extension-based | Native, deeper integration |
| Codebase Awareness | Limited to current file | Understands entire project |
| Multi-file Edits | Manual across files | AI can modify multiple files |
| Learning Curve | Standard, well-documented | Similar, with AI features |
| Maturity | Very mature, stable | Newer, rapidly evolving |
| Extensions | Full VS Code ecosystem | Most VS Code extensions work |
Our Approach: Learn VS Code first because:
- It’s the industry standard you’ll encounter everywhere
- Understanding traditional workflows makes AI enhancements more meaningful
- VS Code skills transfer directly to Cursor (it’s a fork)
- Once you master VS Code + Copilot, Cursor will feel like a natural evolution
8. Installing and Configuring Visual Studio Code
8.1 Windows Installation
- Navigate to https://code.visualstudio.com
- Click the “Download for Windows” button
- Run the downloaded installer (
VSCodeUserSetup-{version}.exe) - Accept the license agreement
- Choose installation location (default is fine)
- Select additional tasks:
- ✅ Add “Open with Code” action to Windows Explorer file context menu
- ✅ Add “Open with Code” action to Windows Explorer directory context menu
- ✅ Register Code as an editor for supported file types
- ✅ Add to PATH (this allows you to open VS Code from the command line)
- Click Install
- Launch VS Code after installation
8.2 Linux (Ubuntu) Installation
8.2.1 Method 1: Using Snap
sudo snap install --classic code
8.2.2 Method 2: Using APT Repository
# Import Microsoft GPG key
wget -qO- https://packages.microsoft.com/keys/microsoft.asc | gpg --dearmor > packages.microsoft.gpg
sudo install -D -o root -g root -m 644 packages.microsoft.gpg /etc/apt/keyrings/packages.microsoft.gpg

# Add VS Code repository
sudo sh -c 'echo "deb [arch=amd64,arm64,armhf signed-by=/etc/apt/keyrings/packages.microsoft.gpg] https://packages.microsoft.com/repos/code stable main" > /etc/apt/sources.list.d/vscode.list'

# Update package list and install
sudo apt update
sudo apt install code
8.3 Essential Extensions
Install these extensions to enhance your development experience:
1. Python - Microsoft (ms-python.python)
   - Python language support and debugging

2. Ruff - Astral Software (astral.sh)
   - Extremely fast Python linter and code formatter

3. C/C++ - Microsoft (ms-vscode.cpptools)
   - C++ language support and debugging

4. Git Lens - Eric Amodio (eamodio.gitlens)
   - Enhanced Git integration and history visualization

5. Bracket Pair Colorizer - CoenraadS (coenraads.bracket-pair-colorizer)
   - Visual bracket matching

6. Live Server - Ritwick Dey (ritwickdey.liveserver)
   - Local development server for web projects
9. GitHub Copilot: Your AI Programming Assistant
Now we arrive at the centerpiece of modern software engineering in the age of generative AI: GitHub Copilot. This tool represents a fundamental shift in how we write code, and understanding how to leverage AI assistance effectively is crucial for modern developers.
9.1 What is GitHub Copilot?
GitHub Copilot is an AI-powered code completion tool developed by GitHub in collaboration with OpenAI. It’s trained on billions of lines of public code and can:
- Suggest entire functions from comments or function signatures
- Complete lines of code as you type
- Generate repetitive code patterns automatically
- Translate natural language descriptions into working code
- Suggest alternative implementations for your code
- Help you learn new APIs, libraries, and programming patterns
Think of Copilot as an experienced developer pair programming with you—suggesting solutions, catching patterns, and helping you write code faster and more correctly.
Think of Copilot as having an experienced programmer pair-programming with you 24/7.
9.2 Why Copilot Matters for This Course
GitHub Copilot isn’t just a productivity tool—it’s a pedagogical revolution. Here’s why it’s central to this course:
9.2.1 Accelerated Learning
When you’re learning a new programming concept, Copilot can show you idiomatic implementations instantly. Instead of spending hours searching documentation and Stack Overflow, you can see working examples in context.
For example, if you write a comment like:
# Create a function that reads a CSV file and returns a pandas DataFrame
Copilot will suggest a complete, working implementation using best practices.
9.2.2 Focus on Problem-Solving, Not Syntax
Programming has two levels:
- Algorithmic thinking: Solving the problem conceptually
- Syntactic implementation: Expressing the solution in a programming language
Beginners often get stuck on syntax when they understand the concept. Copilot handles much of the syntactic complexity, allowing you to focus on higher-level problem-solving. As you see Copilot’s suggestions, you naturally learn correct syntax.
9.2.3 Real-World Skill
AI-assisted coding is now standard practice in industry. Companies like Microsoft, Google, and Amazon actively encourage developers to use AI coding assistants. Learning to work effectively with Copilot prepares you for modern professional development workflows.
9.2.4 Code Quality Improvement
Copilot suggests code following established patterns and best practices. It often includes error handling, uses appropriate data structures, and follows style conventions—all things beginners might forget.
9.2.5 Exploration and Experimentation
Want to try a different approach? Copilot can suggest alternatives, letting you explore multiple solutions and understand tradeoffs. This experimental mindset is crucial for developing engineering judgment.
9.3 Understanding Copilot’s Capabilities and Limitations
It’s crucial to understand what Copilot can and cannot do:
9.3.1 What Copilot Excels At:
- Boilerplate code: Standard patterns, common structures
- Well-defined problems: Tasks with clear descriptions
- Popular languages and frameworks: Python, JavaScript, C++, React, etc.
- Code completion: Finishing functions you’ve started
- Unit tests: Generating test cases for existing functions
- Documentation: Writing docstrings and comments
9.3.2 What Copilot Struggles With:
- Novel algorithms: Unique solutions to uncommon problems
- Domain-specific logic: Your specific business requirements
- Complex architectural decisions: High-level system design
- Security-critical code: May suggest insecure patterns if not careful
- Understanding context fully: May miss subtle requirements
- Debugging complex issues: Can suggest, but can’t fully reason about bugs
9.3.3 The Critical Point: You Remain the Programmer
Copilot is a tool that amplifies your abilities—it doesn’t replace your judgment. You must:
- Understand the code it suggests: Never accept code you don’t understand
- Review for correctness: Copilot can be wrong or suggest suboptimal solutions
- Test thoroughly: AI-generated code needs testing like any code
- Maintain architectural vision: You design the system; Copilot implements details
- Consider edge cases: Copilot may miss unusual scenarios
Think of Copilot as an intelligent autocomplete, not an autonomous programmer. The human developer remains essential.
9.4 Installing GitHub Copilot in VS Code
9.4.1 Step 1: Get Access
- Verify student status - Should be included in your GitHub Student Pack
- If not available, visit copilot.github.com to sign up
9.4.2 Step 2: Install GitHub Copilot Extension
- Open VS Code
- Go to Extensions (Ctrl+Shift+X)
- Search for “GitHub Copilot”
- Install the official GitHub Copilot extension
- Sign in when prompted with your GitHub account
9.4.3 Step 3: Sign In to GitHub
Click Sign in to GitHub when prompted, or:
- Press
Ctrl+Shift+Pto open Command Palette - Type “GitHub Copilot: Sign In”
- Your browser will open to authenticate
- Authorize VS Code to access your GitHub account
- Return to VS Code
You should see a confirmation that Copilot is active.
9.4.4 Step 4: Optional - Install GitHub Copilot Chat
For an even more powerful experience, also install GitHub Copilot Chat:
- Search for “GitHub Copilot Chat” in Extensions
- Install it
- A chat icon appears in the Activity Bar
Copilot Chat allows you to have conversations with the AI, asking questions about code, requesting explanations, or getting help debugging.
9.5 Alternatives to Consider: Cursor
Cursor is an emerging AI-first code editor that we’ll explore later in the course:
- Enhanced AI capabilities - More context-aware than standard Copilot
- Natural language editing - Describe changes in plain English
- Codebase understanding - AI that comprehends your entire project
- Advanced refactoring - AI-assisted code improvements
We’ll compare these tools and help you choose the best AI assistance for different scenarios.
10. Installing Python: The Language of Modern Development
Before we can write and run Python programs, we need to install Python on our system. Python is the primary programming language we’ll use throughout this course, and having a proper installation is essential for everything that follows.
10.1 Why Python Installation Matters
Unlike some languages that come pre-installed on certain systems, Python needs to be installed and configured correctly to ensure:
- Consistent behavior across different environments
- Access to the latest features and security updates
- Proper package management capabilities
- Compatibility with modern development tools like VS Code and Copilot
10.2 Checking if Python is Already Installed
Before installing, let’s check if Python is already available on your system. Open a terminal (Command Prompt on Windows, Terminal on Linux) and type:
python --version
Or try:
python3 --version
If you see a version number like Python 3.11.x or Python 3.12.x, Python is installed. However, you may still want to follow the installation steps to ensure you have the latest version and proper configuration.
10.3 Windows Installation
10.3.1 Step 1: Download Python
- Visit the official Python website: python.org
- Click on “Downloads” in the navigation menu
- The website should automatically suggest the latest version for Windows
- Click “Download Python 3.12.x” (or the latest 3.x version available)
Alternatively, you can go directly to: python.org/downloads/windows
10.3.2 Step 2: Run the Installer
- Locate the downloaded file (usually in your Downloads folder):
python-3.12.x-amd64.exe - Right-click and select “Run as administrator” (important!)
- CRITICAL: Before clicking “Install Now”, check these options:
- ✅ “Add python.exe to PATH” (at the bottom of the installer window)
- ✅ “Install launcher for all users” (recommended)
Why “Add to PATH” is Critical:
The PATH is an environment variable that tells Windows where to find executable programs. By adding Python to PATH, you can run Python from any directory in the command prompt without typing the full path to the Python executable.
Without this, typing python in the command prompt will result in an error like: 'python' is not recognized as an internal or external command.
- Click “Install Now” (recommended for most users) or “Customize installation” if you want to change the installation directory
10.3.3 Step 3: Verify Installation
After installation completes:
- Open Command Prompt (press
Win + R, typecmd, press Enter) - Type the following commands to verify:
python --version
You should see something like:
Python 3.12.0
Also verify pip (Python’s package installer) is installed:
pip --version
You should see:
pip 23.x.x from C:\...\Python312\lib\site-packages\pip (python 3.12)
10.3.4 Step 4: Update pip (Optional but Recommended)
It’s good practice to ensure pip is up to date:
python -m pip install --upgrade pip
10.3.5 Common Windows Issues and Solutions
Issue 1: “python is not recognized”
- Solution: You forgot to check “Add to PATH” during installation. Either:
- Reinstall Python with the PATH option checked, or
- Manually add Python to PATH (Advanced: System Properties > Environment Variables > Edit PATH)
Issue 2: Microsoft Store Python opens instead
- Problem: Windows 10/11 has an alias that redirects
pythonto Microsoft Store - Solution:
- Go to Settings > Apps > Apps & features > App execution aliases
- Turn OFF the toggles for “python.exe” and “python3.exe”
10.4 Linux (Ubuntu) Installation
Ubuntu typically comes with Python 3 pre-installed, but it might not be the latest version. Let’s ensure you have Python 3.11 or newer.
10.4.1 Step 1: Check Current Python Version
python3 --version
If you see Python 3.11 or newer, you’re good to go! If not, or if Python isn’t installed, continue with the installation steps.
10.4.2 Step 2: Update Package Manager
First, update your package manager to ensure you get the latest available packages:
sudo apt update
sudo apt upgrade
10.4.3 Step 3: Install Python 3.12 (Latest Stable)
Ubuntu’s default repositories might not have the very latest Python version. We’ll use the deadsnakes PPA (Personal Package Archive) to get Python 3.12:
# Add the deadsnakes PPA
sudo add-apt-repository ppa:deadsnakes/ppa

# Update package list
sudo apt update

# Install Python 3.12
sudo apt install python3.12

# Install pip for Python 3.12
sudo apt install python3.12-venv python3.12-dev

# Install pip
curl -sS https://bootstrap.pypa.io/get-pip.py | python3.12
Note: The deadsnakes PPA is a trusted repository maintained by the Python community specifically for providing newer Python versions to Ubuntu users.
10.4.4 Step 4: Set Python 3.12 as Default (Optional)
Ubuntu uses python3 as the command for Python 3. To make Python 3.12 the default when you type python3:
# Update alternatives
sudo update-alternatives --install /usr/bin/python3 python3 /usr/bin/python3.12 1

# Verify
python3 --version
10.4.5 Step 5: Verify Installation
# Check Python version
python3 --version

# Check pip version
pip3 --version
# or
python3 -m pip --version
You should see Python 3.12.x and pip information.
10.4.6 Step 6: Install Essential Development Tools
While we’re at it, let’s install some essential development tools:
sudo apt install build-essential python3-dev
These tools are necessary for compiling certain Python packages that have C extensions.
10.5 Verifying Your Python Installation Works
Regardless of your operating system, let’s verify Python is working correctly:
10.5.1 Test 1: Run Python Interactive Shell
python      # Windows
python3     # Linux
You should see the Python interactive prompt:
Python 3.12.0 (main, Oct  8 2025, 12:00:00)
[GCC 11.4.0] on linux
Type "help", "copyright", "credits" or "license" for more information.
>>>
Try a simple calculation:
>>> print("Hello, World!")
Hello, World!
>>> 2 + 2
4
>>> exit()
10.5.2 Test 2: Run a Python Script
Create a test file called test.py:
Windows (PowerShell):
echo 'print("Python is working!")' > test.py
python test.py
Linux (Terminal):
echo 'print("Python is working!")' > test.py
python3 test.py
You should see: Python is working!
10.5.3 Test 3: Verify pip Can Install Packages
Try installing a simple package:
pip install requests     # Windows
pip3 install requests    # Linux
If successful, you’ll see:
Successfully installed requests-2.31.0 ...
10.6 Python Command Differences: Windows vs. Linux
Important Note: Throughout this course, you’ll see commands written as python. Here’s what you should actually type:
| Command in Course Materials | What to Type on Windows | What to Type on Linux |
|---|---|---|
python |
python |
python3 |
pip |
pip |
pip3 |
python --version |
python --version |
python3 --version |
Why the difference?
- Windows: Python 3 is called
python(Python 2 is legacy and rarely installed) - Linux:
pythonmight point to Python 2 (legacy), sopython3ensures you use Python 3
Recommendation: On Linux, you can create an alias for convenience:
# Add to ~/.bashrc
echo "alias python='python3'" >> ~/.bashrc
echo "alias pip='pip3'" >> ~/.bashrc
source ~/.bashrc
After this, python will work the same as python3.
10.7 What We’ve Installed
By completing these installation steps, you now have:
- Python 3.12 - The latest stable version of Python
- pip - Python’s package installer for adding libraries
- IDLE - Python’s built-in development environment (optional, we’ll use VS Code)
- Python Standard Library - Hundreds of modules for common tasks
- Development headers (Linux) - For compiling Python packages with C extensions
10.8 Troubleshooting Common Issues
Issue: “Permission denied” errors when installing packages
- Solution:
- Don’t use
sudo pip(this installs packages system-wide and can break things) - Use virtual environments instead (we’ll cover this in Part 2)
- Or use
pip install --user package_namefor user-only installation
- Don’t use
Issue: Multiple Python versions causing conflicts
- Solution:
- Use
python3.12 -m pip install packageto be explicit about which Python version - Consider using
pyenv(advanced tool) to manage multiple Python versions
- Use
Issue: Old Python version persists after installing new version
- Solution:
- Check your PATH environment variable order
- Make sure the new Python installation directory comes before the old one in PATH
10.9 Next Steps: Virtual Environments (Part 2 Preview)
While we now have Python installed globally, modern Python development uses virtual environments to isolate project dependencies. We’ll cover this in detail in Chapter 01 (Modern Python Development), along with modern tools like uv that make Python project management even easier.
For now, having Python properly installed is sufficient to continue with this lecture.
11. Your First Development Workflow
Now that we have Python installed, let’s put everything together with a practical example:
11.1 Step 1: Open Your Repository in VS Code
cd ~/Documents/MyFirstRepo
code .
11.2 Step 2: Create a Simple Python Program
Create a new file called hello_world.py:
# Simple greeting program
def greet_user(name: str) -> str:
    """
    Generate a personalized greeting message
    Args:
        name: The user's name
    Returns:
        A formatted greeting string
    """
    return f"Hello, {name}! Welcome to modern software engineering."

def main():
    """Main function to run the greeting program"""
    user_name = input("Enter your name: ")
    greeting = greet_user(user_name)
    print(greeting)

if __name__ == "__main__":
    main()
11.3 Step 3: Test Your Program
python hello_world.py
11.4 Step 4: Commit Your Changes
# Check what files have changed
git status

# Add your new file
git add hello_world.py

# Commit with a descriptive message
git commit -m "Add hello world program with user input functionality"

# Push to GitHub
git push origin main
11.5 Step 5: Verify on GitHub
Visit your repository on GitHub and see your new file appear with the commit message.
12. Modern Development Workflow Visualization
12.1 Appendix: Setting Up SSH Keys for GitHub (Optional but Recommended)
SSH keys provide a more secure and convenient way to authenticate with GitHub without entering passwords.
12.1.1 Generating SSH Keys
Windows (Git Bash) or Linux:
# Generate new SSH key
ssh-keygen -t ed25519 -C "your.email@university.edu"

# Start SSH agent
eval "$(ssh-agent -s)"

# Add key to agent
ssh-add ~/.ssh/id_ed25519
12.1.2 Adding SSH Key to GitHub
- Copy your public key:
cat ~/.ssh/id_ed25519.pub - Go to GitHub Settings > SSH and GPG keys > New SSH key
-
Paste your public key and save
- Test connection:
ssh -T git@github.com
Now you can clone and push using SSH URLs instead of HTTPS.
13. Summary and Key Takeaways
Today we’ve established the foundation of modern software development:
13.1 Core Concepts Mastered
- Repositories as comprehensive development ecosystems
- GitHub as the industry-standard platform for code collaboration
- Git as the universal version control system
- VS Code as a powerful, extensible development environment
- GitHub Copilot as your AI programming assistant
13.2 Professional Skills Developed
- Created your first GitHub repository
- Installed and configured a complete development toolchain
- Learned the fundamental workflow of modern software development
- Established your presence in the global developer community
13.3 The Modern Advantage
You’re now equipped with the same tools used by developers at Google, Microsoft, Netflix, and every major tech company. The combination of:
- Professional version control (Git/GitHub)
- Intelligent development environment (VS Code)
- AI-powered assistance (GitHub Copilot)
…represents the cutting edge of software engineering productivity.
14. Lecture Quiz: Test Your Understanding
Now that you’ve completed Chapter 01 (Modern Development Tools), it’s time to assess your understanding of the key concepts we’ve covered. This quiz serves multiple important purposes:
14.1 Why Take This Quiz?
For Your Learning:
- Self-Assessment: Identify areas where you have strong understanding and topics that need review
- Exam Preparation: The quiz format and difficulty mirror what you can expect in the final exam
- Immediate Feedback: Get instant feedback on your answers to reinforce correct understanding
- Active Recall: Testing yourself is one of the most effective learning techniques
For Course Improvement:
- Anonymous Feedback: Your responses help me understand which concepts need more explanation
- Content Adjustment: If many students struggle with a topic, we’ll spend more time on it in class
- Pacing Indicator: Shows me if we’re moving too fast or too slow
14.2 Quiz Details
- Time Required: Approximately 5-10 minutes
- Questions: 20 multiple-choice questions covering all major topics from this lecture
- Topics Covered:
- Repository fundamentals and version control concepts
- GitHub vs. GitLab comparison
- Git installation and configuration
- Cloning and basic Git workflow
- IDE concepts and VS Code features
- GitHub Copilot capabilities and limitations
- Modern development workflows
- Format: Multiple choice with instant feedback
- Privacy: Completely anonymous - no personal information collected
- Attempts: You can take it multiple times to improve your understanding
- Grading: Automatically scored with explanations for each answer
14.3 How to Use This Quiz Effectively
- Complete the lecture first: Make sure you’ve read through all sections
- Take it seriously: Treat it like a practice exam
- Don’t rush: Think carefully about each question
- Review wrong answers: Pay special attention to the explanations for questions you miss
- Retake if needed: If you score below 80%, review the material and try again
14.4 Important Notes
- This quiz is not graded and does not affect your final course grade
- Results are used only for improving teaching and helping you prepare for the actual exam
- Questions similar to these will appear in the final exam
- Each lecture will have a similar quiz throughout the semester
📋 Ready to test your knowledge?
Take the Chapter 01 (Modern Development Tools) Quiz
After completing the quiz, you’ll have a clear picture of your mastery of this lecture’s content. Remember: struggling with some questions is normal and expected - that’s how you learn!
15. Additional Resources
15.1 Essential Reading
- Pro Git Book - Comprehensive Git reference
- GitHub Docs - Official GitHub documentation
- VS Code Tips - Maximize your editor efficiency
15.2 Practice Platforms
- GitHub Learning Lab - Interactive Git tutorials
- Learn Git Branching - Visual Git learning